1、eNSP环境准备
提供虚拟机镜像包,可直接使用,大概20G
需要请联系1099428989@qq.com
2、测试设备
2.1、路由器
AR201
AR1220
AR2220
AR2240
AR3260
NE40E(需导入镜像)
NE5000E(需导入镜像)
NE9000(需导入镜像)
CX(需导入镜像)
2.2、交换机
- S5700
- S3700
- CE6800(需导入镜像)
- CE12800(需导入镜像)
2.3、防火墙
- USG5500
- USG6000V
3、测试环境&测试过程
- jdk-1.8.0_392
- 测试工具:IDEA
- 主机IP:192.168.133.1/24
- 网关:192.168.133.2
- 虚拟机(已安装eNSP环境,可直接使用)IP:192.168.133.131/24
- 代理机(可选,默认直连)IP:192.168.133.129/24
- 网络设备默认配置IP:192.168.133.132/24
3.1、依赖包
<dependency>
  <groupId>com.github.mwiede</groupId>
  <artifactId>jsch</artifactId>
  <version>2.27.2</version>
</dependency>
<dependency>
  <groupId>org.projectlombok</groupId>
  <artifactId>lombok</artifactId>
</dependency>
3.2、测试代码
NetworkSSHClient.java
import com.jcraft.jsch.*;
import lombok.extern.slf4j.Slf4j;

import java.io.IOException;
import java.io.InputStream;
import java.io.OutputStream;
import java.io.PrintWriter;
import java.nio.charset.Charset;
import java.nio.charset.StandardCharsets;
import java.util.ArrayList;
import java.util.LinkedList;
import java.util.List;

@Slf4j
public class NetworkSSHClient {
  private final static int MAX_RESULT_SIZE = 3 * 1024 * 1024; // 4MB,设置接收最大结果大小为4M;
  private int connectTimeout = 12000;
  // 半个小时
  private int executeTimeout = 1800000;
  private String failErr = "";


  private byte executeStatus = 1;

  public byte getExecuteStatus() {
    return executeStatus;
  }

  // 代理机session
  private final List<Session> sessionList = new ArrayList<>();
  public Session session;

  // 是否同时执行多个脚本,默认登录执行完就关闭
  private int isMultipleShell = 0;
  private Charset charset = StandardCharsets.UTF_8;

  public void setConnectTimeout(int connectTimeout) {
    this.connectTimeout = connectTimeout;
  }

  public void setExecuteTimeout(int executeTimeout) {
    this.executeTimeout = executeTimeout;
  }

  public void setCharset(Charset charset) {
    this.charset = charset;
  }

  public String getFailErr() {
    return this.failErr;
  }

  public boolean connect(String host, String account, String password, int port) {
    return connect(host, account, password, port, connectTimeout, null);
  }

  public boolean connect(String host, String account, String password, int port, int timeout) {
    return connect(host, account, password, port, timeout, null);
  }

  public boolean connect(String host, String account, String password, int port, List<HostDTO> agentList) {
    return connect(host, account, password, port, connectTimeout, agentList);
  }

  public boolean connect(String host, String account, String password, int port,
                         String agentHost, String agentAccount, String agentPassword, int agentPort) {
    HostDTO h = new HostDTO();
    h.setIp(agentHost);
    h.setPassword(agentPassword);
    h.setAccount(agentAccount);
    h.setPort(agentPort);
    List<HostDTO> list = new ArrayList<>();
    list.add(h);
    return connect(host, account, password, port, connectTimeout, list);
  }

  public boolean connect(String host, String account, String password, int port, int timeout,
                         String agentHost, String agentAccount, String agentPassword, int agentPort) {
    HostDTO h = new HostDTO();
    h.setIp(agentHost);
    h.setPassword(agentPassword);
    h.setAccount(agentAccount);
    h.setPort(agentPort);
    List<HostDTO> list = new ArrayList<>();
    list.add(h);
    return connect(host, account, password, port, timeout, list);
  }

  public boolean connect(String host, String account, String password, int port, int timeout,
                         List<HostDTO> agentList) {
    JSch jsch = new JSch();
    if (agentList != null && agentList.size() > 0) {
      Session lastSession;
      try {
        // 第一台直连
        Session agentSession = jsch.getSession(agentList.get(0).getAccount(), agentList.get(0).getIp(), agentList.get(0).getPort());
        agentSession.setPassword(agentList.get(0).getPassword());
        agentSession.setConfig("StrictHostKeyChecking", "no");
        agentSession.setConfig("PreferredAuthentications", "password,keyboard-interactive");
        agentSession.setConfig("dhgex_preferred", "1024");
        agentSession.setConfig("dhgex_min", "1024");
        // 添加keep-alive配置,防止长时间命令执行时连接被断开
        agentSession.setServerAliveInterval(30000); // 30秒发送一次keep-alive
        agentSession.setServerAliveCountMax(3); // 最多3次keep-alive失败后断开
        agentSession.connect(timeout);
        sessionList.add(agentSession);
        lastSession = agentSession;
        // 多层调转机,后面的跳转机开启一个SSH隧道
        for (int i = 1; i < agentList.size(); i++) {
          HostDTO agent = agentList.get(i);
          int assignedPort = lastSession.setPortForwardingL(0, agent.getIp(), agent.getPort()); // 在第一台跳板机上开启SSH隧道
          log.debug("SSH tunnel established on port, port = {}", assignedPort);
          Session agentSession1 = jsch.getSession(agent.getAccount(), "127.0.0.1", assignedPort); // 创建第二台跳板机的SSH会话,使用第一台跳板机的SSH隧道连接
          agentSession1.setPassword(agent.getPassword());
          agentSession1.setConfig("StrictHostKeyChecking", "no");
          agentSession.setConfig("PreferredAuthentications", "password,keyboard-interactive");
          agentSession.setConfig("dhgex_preferred", "1024");
          agentSession.setConfig("dhgex_min", "1024");
          // 添加keep-alive配置,防止长时间命令执行时连接被断开
          agentSession1.setServerAliveInterval(30000); // 30秒发送一次keep-alive
          agentSession1.setServerAliveCountMax(3); // 最多3次keep-alive失败后断开
          agentSession1.connect(timeout);
          sessionList.add(agentSession1);
          lastSession = agentSession1;
        }
      } catch (JSchException e) {
        this.failErr = "连接代理主机异常," + e.getMessage();
        log.error("连接代理主机异常", e);
        disconnect();
        return false;
      }
      // 最终连接的跳转机
      try {
        int assignedPort = lastSession.setPortForwardingL(0, host, port); // 在第一台跳板机上开启SSH隧道
        log.debug("SSH tunnel established on port, port = {}", assignedPort);
        this.session = jsch.getSession(account, "127.0.0.1", assignedPort); // 创建第二台跳板机的SSH会话,使用第一台跳板机的SSH隧道连接
        this.session.setPassword(password);
        this.session.setConfig("StrictHostKeyChecking", "no");
        this.session.setConfig("PreferredAuthentications", "password,keyboard-interactive");
        this.session.setConfig("dhgex_preferred", "1024");
        this.session.setConfig("dhgex_min", "1024");

        // 1. 【核心步骤】配置 KEX (密钥交换) 算法列表
        String preferredKex =
          "ecdh-sha2-nistp256," +              // 新算法
            "ecdh-sha2-nistp384," +
            "ecdh-sha2-nistp521," +
            "diffie-hellman-group-exchange-sha256," +
            "diffie-hellman-group16-sha512," +
            "diffie-hellman-group18-sha512," +
            "diffie-hellman-group14-sha256," +
            "diffie-hellman-group14-sha1," +
            "diffie-hellman-group-exchange-sha1," + // 兼容旧设备
            "diffie-hellman-group1-sha1";           // 兼容极旧设备

        this.session.setConfig("kex", preferredKex);
        this.session.setConfig("server_host_key", "ecdsa-sha2-nistp256,ssh-rsa");
        // 2. (可选) 有时旧设备也可能需要兼容旧的加密算法和HMAC算法
        // 如果遇到 Algorithm negotiation fail 报 cipher 或 mac 错误,可以同样配置
        String preferredCiphers = "aes256-ctr,aes192-ctr,aes128-ctr,aes256-cbc,aes192-cbc,aes128-cbc,3des-cbc";
        session.setConfig("cipher.s2c", preferredCiphers);
        session.setConfig("cipher.c2s", preferredCiphers);

        // 添加keep-alive配置,防止长时间命令执行时连接被断开
        this.session.setServerAliveInterval(30000); // 30秒发送一次keep-alive
        this.session.setServerAliveCountMax(3); // 最多3次keep-alive失败后断开
        this.session.connect(timeout);
      } catch (JSchException e) {
        this.failErr = "代理主机连接到目标主机异常," + e.getMessage();
        log.error("代理主机连接到目标主机异常{}@{}:{}, {}", account, host, port, e);
        disconnect();
        return false;
      }
    } else {
      try {
        this.session = jsch.getSession(account, host, port);
        this.session.setPassword(password);
        this.session.setConfig("StrictHostKeyChecking", "no");
        this.session.setConfig("PreferredAuthentications", "password,keyboard-interactive");
        this.session.setConfig("dhgex_preferred", "1024");
        this.session.setConfig("dhgex_min", "1024");

        // 1. 【核心步骤】配置 KEX (密钥交换) 算法列表
        String preferredKex =
          "ecdh-sha2-nistp256," +              // 新算法
            "ecdh-sha2-nistp384," +
            "ecdh-sha2-nistp521," +
            "diffie-hellman-group-exchange-sha256," +
            "diffie-hellman-group16-sha512," +
            "diffie-hellman-group18-sha512," +
            "diffie-hellman-group14-sha256," +
            "diffie-hellman-group14-sha1," +
            "diffie-hellman-group-exchange-sha1," + // 兼容旧设备
            "diffie-hellman-group1-sha1";           // 兼容极旧设备

        this.session.setConfig("kex", preferredKex);
        this.session.setConfig("server_host_key", "ecdsa-sha2-nistp256,ssh-rsa");

        // 2. (可选) 有时旧设备也可能需要兼容旧的加密算法和HMAC算法
        // 如果遇到 Algorithm negotiation fail 报 cipher 或 mac 错误,可以同样配置
        String preferredCiphers = "aes256-ctr,aes192-ctr,aes128-ctr,aes256-cbc,aes192-cbc,aes128-cbc,3des-cbc";
        session.setConfig("cipher.s2c", preferredCiphers);
        session.setConfig("cipher.c2s", preferredCiphers);

        // 添加keep-alive配置,防止长时间命令执行时连接被断开
        this.session.setServerAliveInterval(30000); // 30秒发送一次keep-alive
        this.session.setServerAliveCountMax(3); // 最多3次keep-alive失败后断开
        this.session.connect(timeout);
      } catch (JSchException e) {
        this.failErr = "直连主机异常," + e.getMessage();
        log.error("直连主机异常{}@{}:{}, {}", account, host, port, e);
        disconnect();
        return false;
      }
    }
    return true;
  }

  public void disconnect() {
    if (this.session != null) {
      this.session.disconnect();
    }
    for (Session session : this.sessionList) {
      if (session != null) {
        session.disconnect();
      }
    }
  }

  public String executeNetworkShell(String command) throws IOException {
    return executeNetworkShell(command, null);
  }

  public String executeNetworkShell(String command, Charset charset) throws IOException {
    if (charset == null) {
      charset = this.charset;
    }
    StringBuilder result = new StringBuilder();
    OutputStream outputStream = null;
    InputStream inputStream = null;
    ChannelShell channelShell = null;
    try {
      if (session == null) {
        throw new RuntimeException("session会话不存在,请先建立连接!");
      }

      channelShell = (ChannelShell) session.openChannel("shell");
      channelShell.setPty(true);
      channelShell.connect(120000);

      outputStream = channelShell.getOutputStream();
      inputStream = channelShell.getInputStream();

      // 发送命令
      PrintWriter printWriter = new PrintWriter(outputStream);
      printWriter.println(command);
      printWriter.flush();

      // 读取连接交换机的欢迎信息,但不添加到结果中
      // readWelcomeInfo(inputStream, outputStream, command);

      // 读取退出命令后的输出
      result.append(getTemplateContent(inputStream, outputStream, command));

      // 发送退出命令
      printWriter.println("exit");
      printWriter.println("quit");
      printWriter.flush();
    } catch (Exception e) {
      log.error("执行命令[{}]失败,详细信息:", command, e);
      throw new RuntimeException("执行命令[" + command + "]失败:" + e.getMessage());
    } finally {
      if (isMultipleShell == 0) {
        disconnect();
      }
      if (outputStream != null) {
        outputStream.close();
      }
      if (inputStream != null) {
        inputStream.close();
      }
      if (channelShell != null) {
        channelShell.disconnect();
      }
    }
    return result.toString();
  }

  public String getTemplateContent(InputStream inputStream, OutputStream outputStream, String command) throws IOException {
    StringBuilder output = new StringBuilder();
    byte[] buffer = new byte[4096];  // 增大缓冲区

    long startTime = System.currentTimeMillis();
    StringBuilder allInfo = new StringBuilder();

    while (System.currentTimeMillis() - startTime <= executeTimeout) {
      // 读取可用数据
      int available = inputStream.available();
      if (available > 0) {
        int bytesRead = inputStream.read(buffer, 0, Math.min(buffer.length, available));
        if (bytesRead > 0) {
          String chunk = new String(buffer, 0, bytesRead, charset);
          if (chunk.trim().isEmpty()) {
            continue;
          }
          // 检查是否包含分页提示
          if (chunk.contains("More") || chunk.contains("Press any key to continue")) {
            // 发送空格键以继续显示下一页
            outputStream.write(' ');
            outputStream.flush();
            continue;
          }
          allInfo.append(chunk);
          // 检查是否包含命令执行结束的提示(可以根据实际提示调整)
          log.info("allInfo:{}, {},{},{},{}", allInfo, chunk.contains("<"), chunk.endsWith(">"), output.toString().indexOf(command), allInfo.toString().lastIndexOf(">"));
          // 一定需要所有的信息中包含有执行的命令
          boolean flag = allInfo.toString().contains(command) || allInfo.toString().contains(command.replaceAll(" ", ""));
          if ((
            chunk.endsWith(">")
              && flag
              && allInfo.toString().endsWith(">"))
            || (chunk.endsWith("#") && flag)) {
            log.info("---------------退出轮询---------------");
            break;
          }
          output.append(chunk);
        }
      }
    }

    return output.toString();
  }


  public void readWelcomeInfo(InputStream inputStream, OutputStream outputStream, String command) throws IOException {
    StringBuilder output = new StringBuilder();
    byte[] buffer = new byte[4096];  // 增大缓冲区

    long startTime = System.currentTimeMillis();

    while (System.currentTimeMillis() - startTime <= executeTimeout) {
      // 读取可用数据
      int available = inputStream.available();
      if (available > 0) {
        int bytesRead = inputStream.read(buffer, 0, Math.min(buffer.length, available));
        if (bytesRead > 0) {
          String chunk = new String(buffer, 0, bytesRead, charset);
          if (chunk.trim().isEmpty() || chunk.startsWith(command)) {
            continue;
          }
          // 检查是否包含分页提示
          if (chunk.contains("More") || chunk.contains("Press any key to continue")) {
            // 发送空格键以继续显示下一页
            outputStream.write(' ');
            outputStream.flush();
            continue;
          }

          if ((chunk.contains("<") && chunk.endsWith(">") && output.toString().contains(command)) || chunk.endsWith("#")) {
            log.info("---------------退出轮询---------------");
            break;
          }
          output.append(chunk);
        }
      }
    }
  }

  public static void main(String[] args) throws Exception {
    NetworkSSHClient sshClient = new NetworkSSHClient();
    String host = "192.168.133.132";
    String account = "sshuser";
    String password = "Huawei@123";
    int port = 22;

    List<HostDTO> agentList = new LinkedList<>();
    HostDTO hostDTO1 = new HostDTO();
    hostDTO1.setIp("192.168.133.129");
    hostDTO1.setAccount("root");
    hostDTO1.setPassword("xy@0302");
    hostDTO1.setPort(22);
    agentList.add(hostDTO1);
    boolean isLogin = sshClient.connect(host, account, password, port, agentList);
    if (isLogin) {
      String result = sshClient.executeNetworkShell("display version");
      System.out.println(result);
    } else {
      System.out.println(sshClient.getFailErr());
    }
    System.out.println("display version".replaceAll(" ",""));
  }
}
HostDTO.java
@Getter
@Setter
@NoArgsConstructor
@AllArgsConstructor
@Builder
public class HostDTO {
  private String id;
  private String ip;
  private String account;
  private String password;
  private Integer port = 22;
  private String path;

  // 执行脚本
  private String script;
  //为主机登录验证时对应主机登录状态,1成功0失败;为主机执行脚本时1为成功0为失败
  private byte status;
  // 执行结果
  private String result;
  // 当前机器的代理机
  private List<HostDTO> agentList;

  // 执行时间
  private Date startTime;
  private Date endTime;

  // 用于标识是否为终止信号
  private boolean isTerminate;
}
3.3、设备配置
路由器
AR201
较旧设备,以AR201为例
开启eNSP所在的虚拟机,默认密码Grbj@123
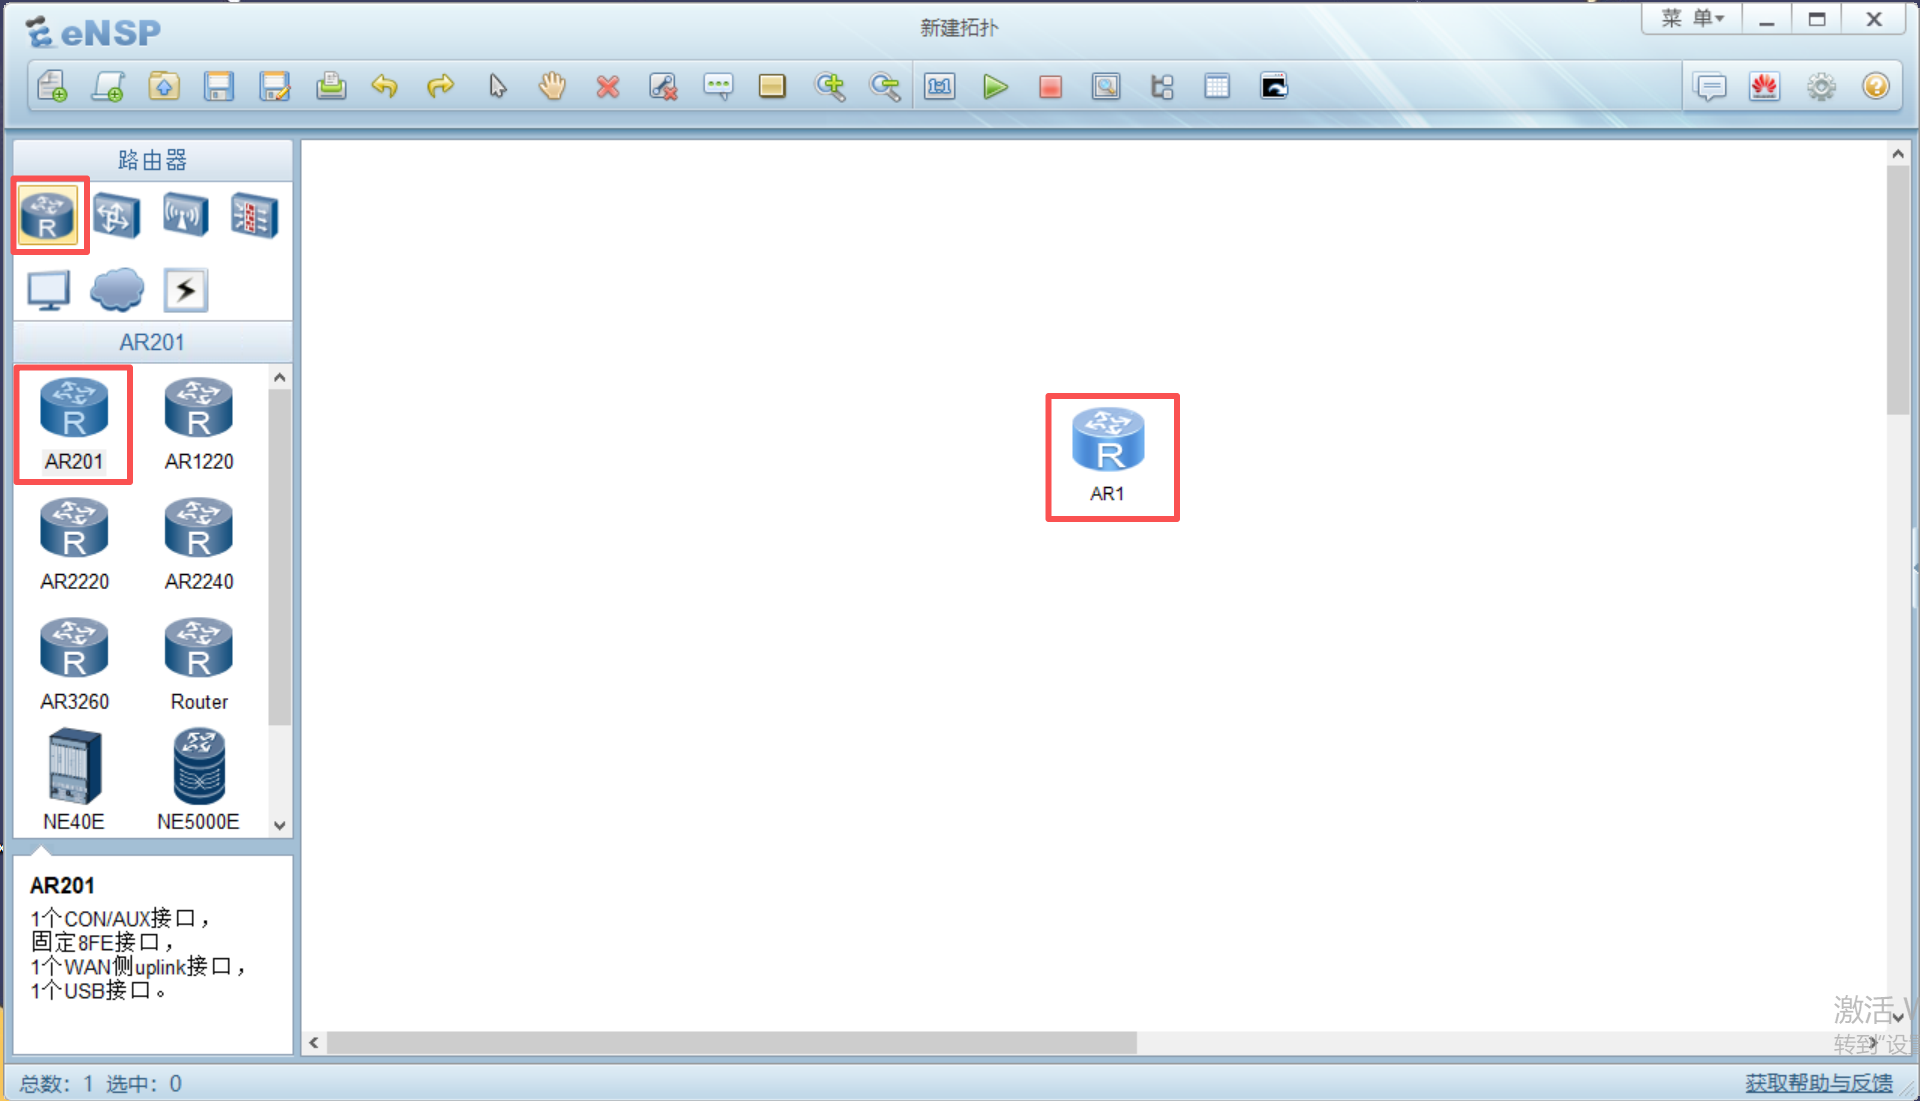
打开eNSP软件
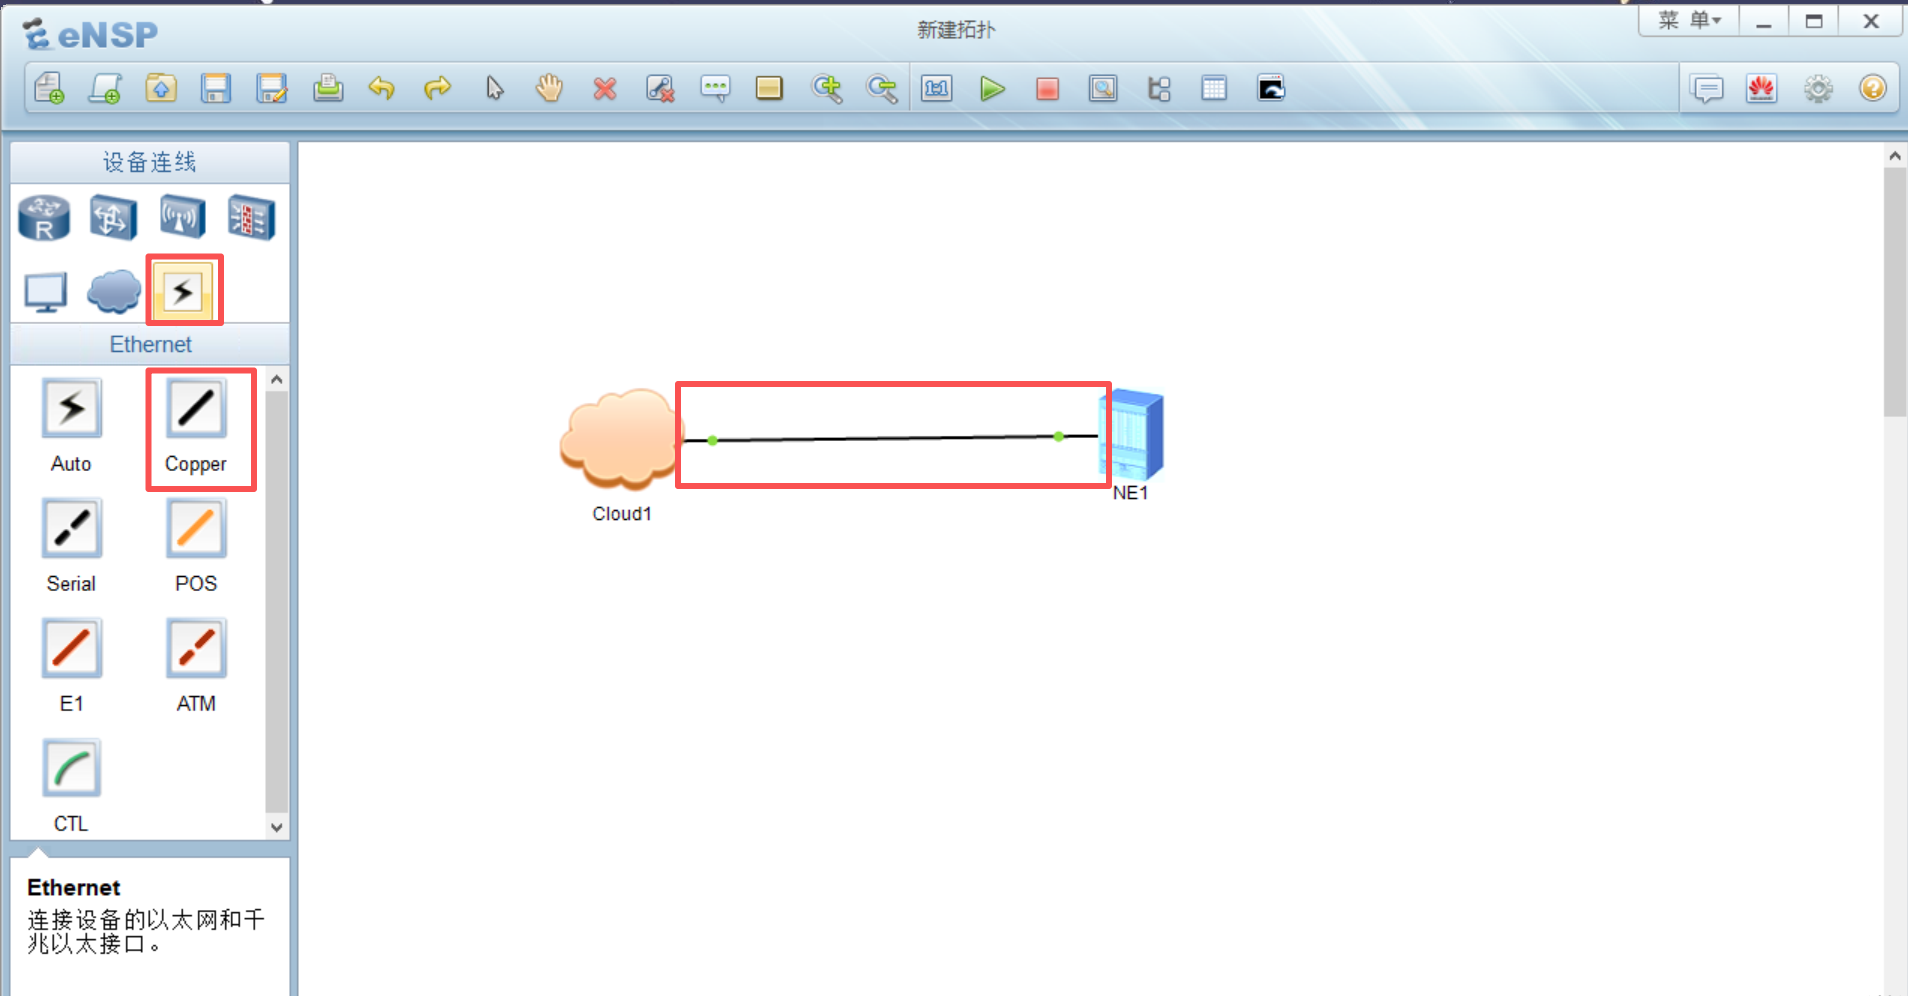
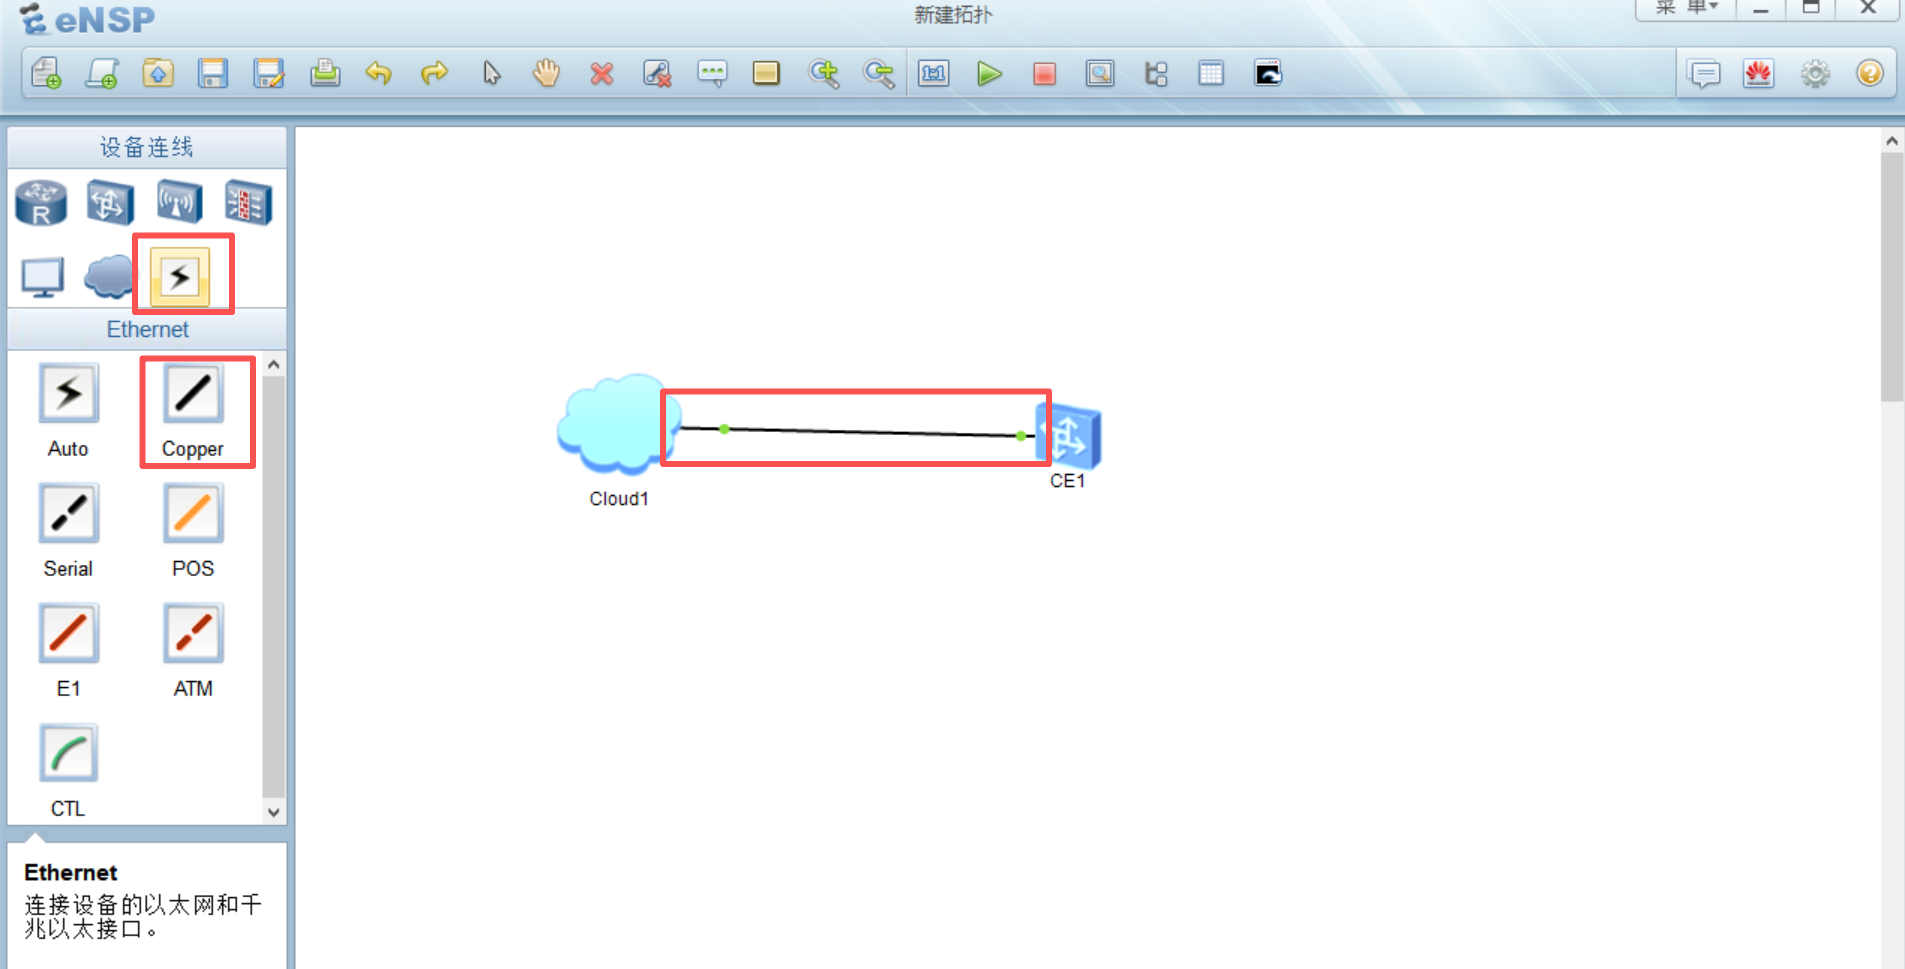
左侧点击路由器,并拖拽AR201设备到拓扑面板中
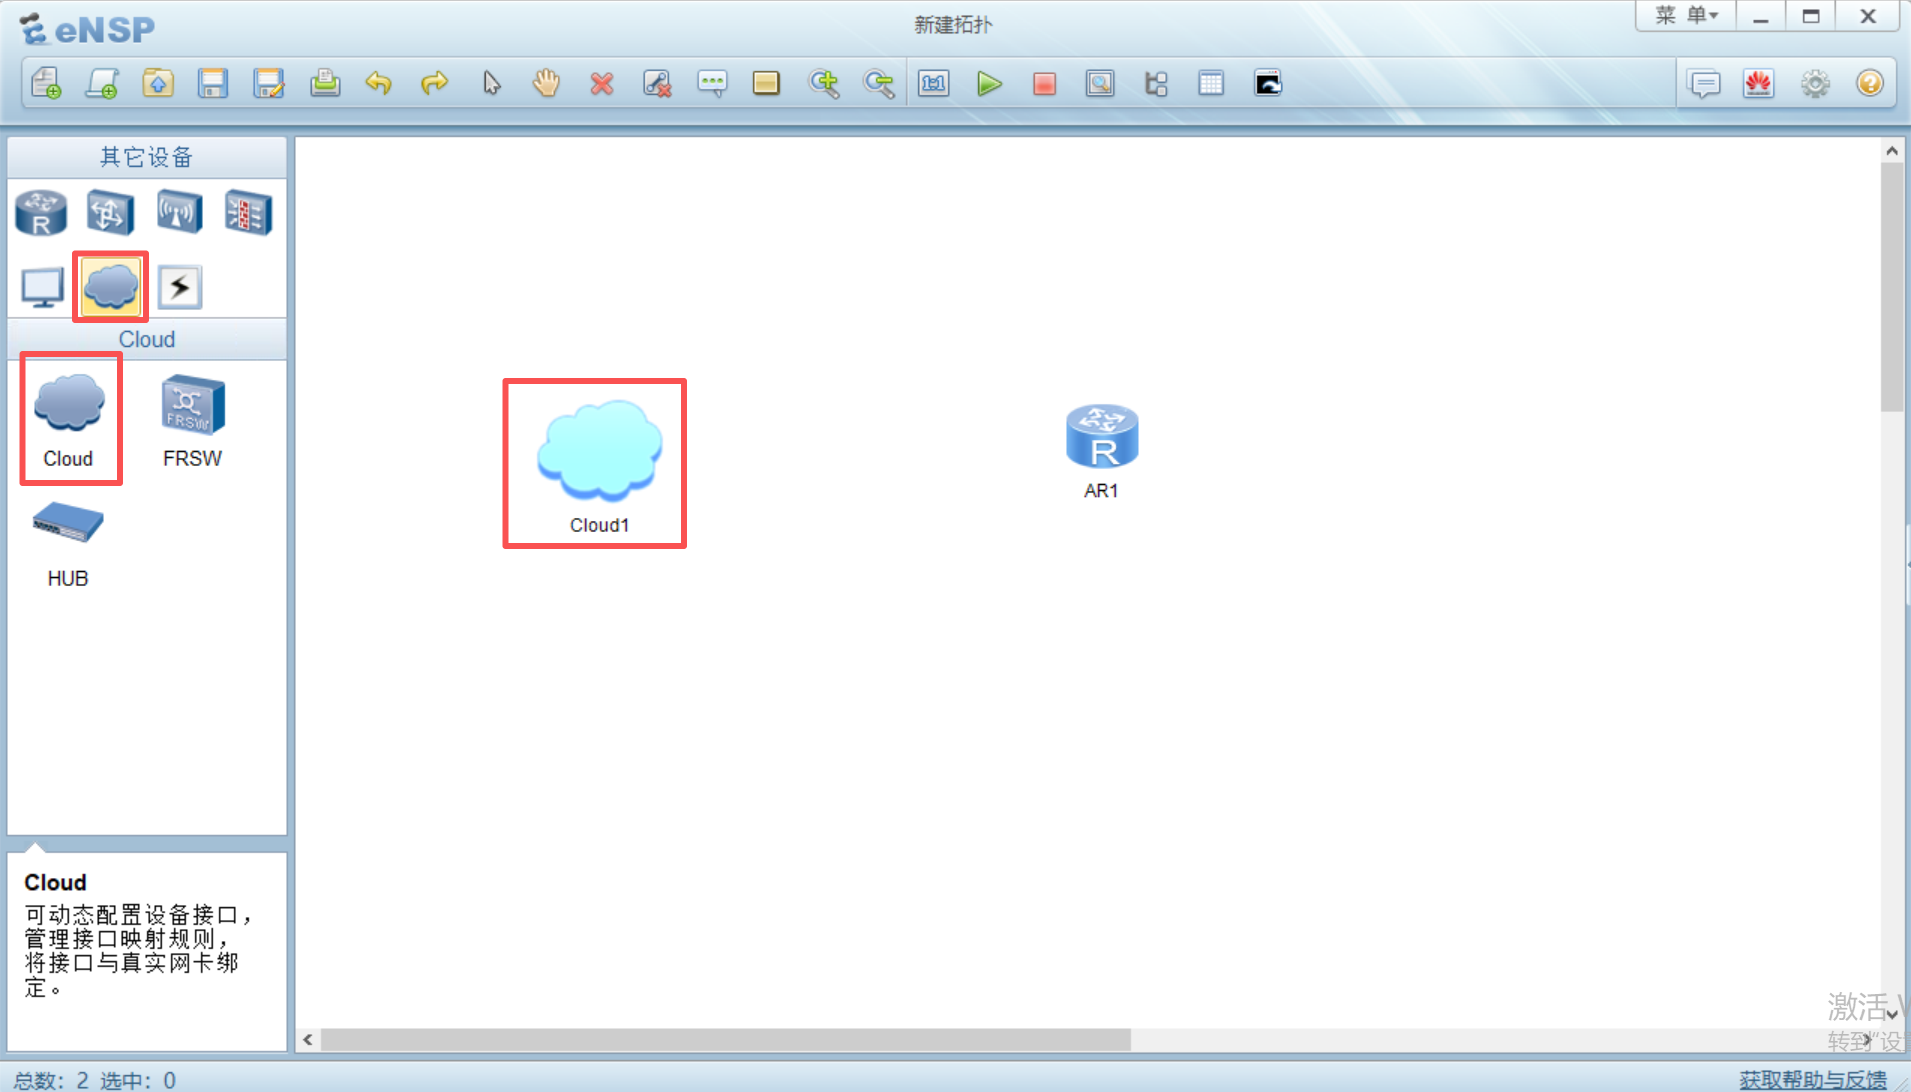
再点击左侧其他设备,将cloud设备拖拽到拓扑中
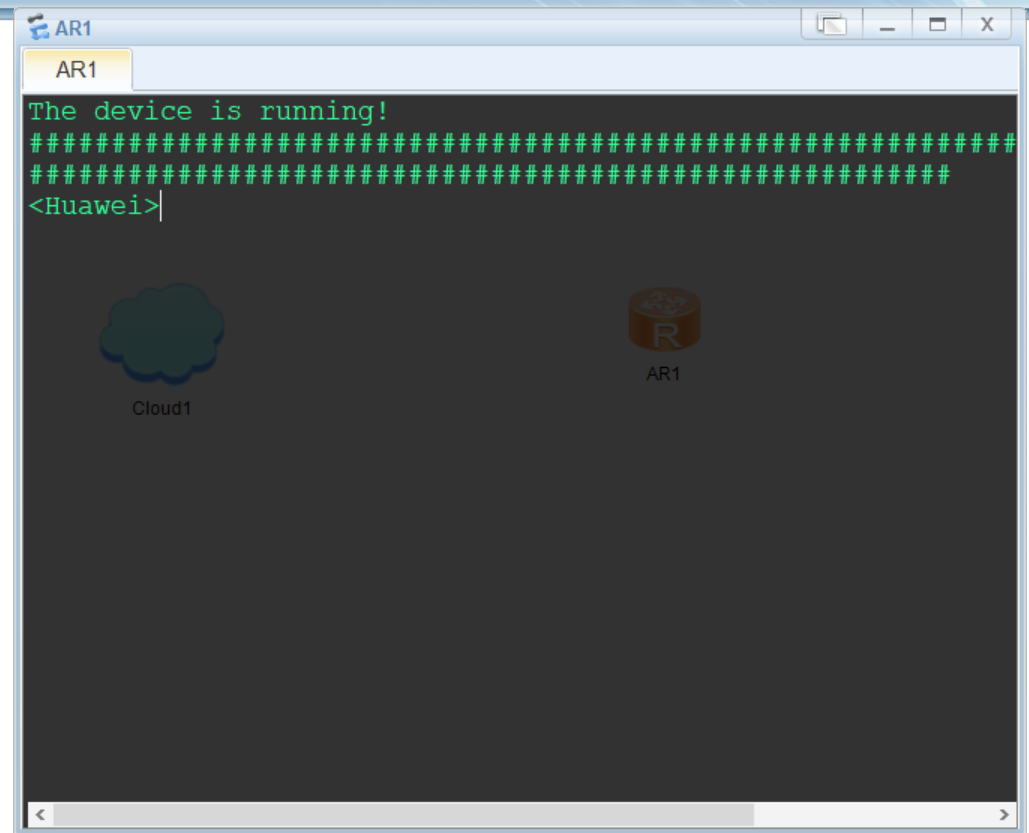
右键AR1路由器启动该设备
左键双击AR1路由器打开终端,等待启动完成(出现<Huawei>表示启动完成)
输入
dis int brief查看可用的接口信息此处使用Ethernet0/0/0接口
按以下脚本配置接口
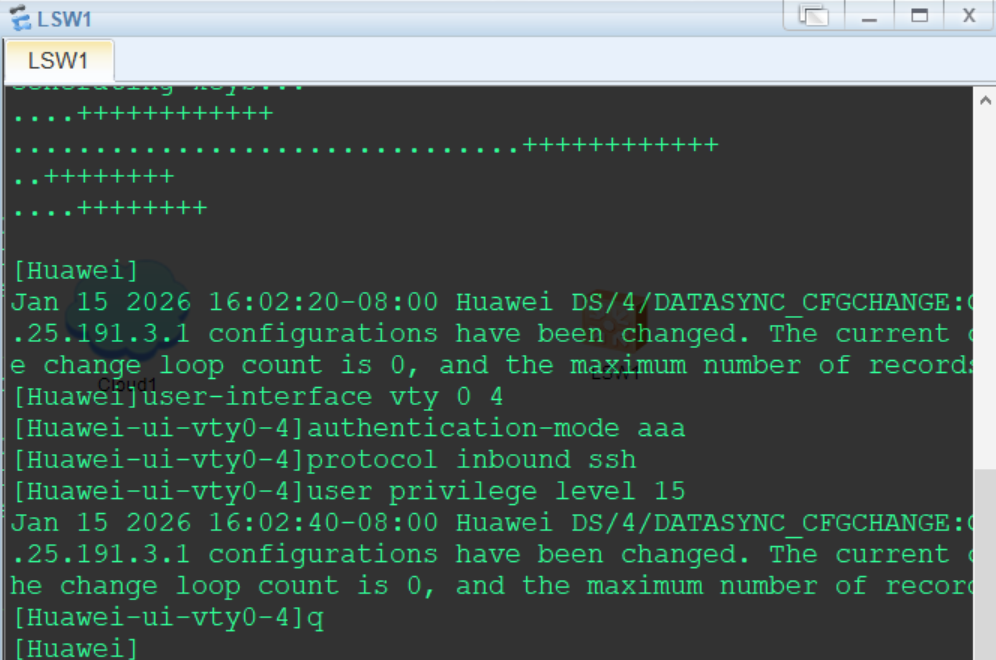
# 进入系统视图
sys
# 进入Ethernet0/0/0接口
int e0/0/0
# 切换到三层
undo portswitch
# 配置接口ip
ip add 192.168.133.132 24
# 回上一级
q
# 开启 SSH 服务
stelnet server enable
# 生成本地密钥对
rsa local-key-pair create
# 开启 0 到 4 共 5 个远程通道
user-interface vty 0 4
# 设置认证模式为 AAA(用户名+密码)
authentication-mode aaa
# 仅允许 SSH 协议(如果想要 Telnet 也可,用 all 或 ssh)
protocol inbound ssh
# 设置用户登录后直接拥有最高权限(15级),否则登录后很多命令看不见
user privilege level 15
q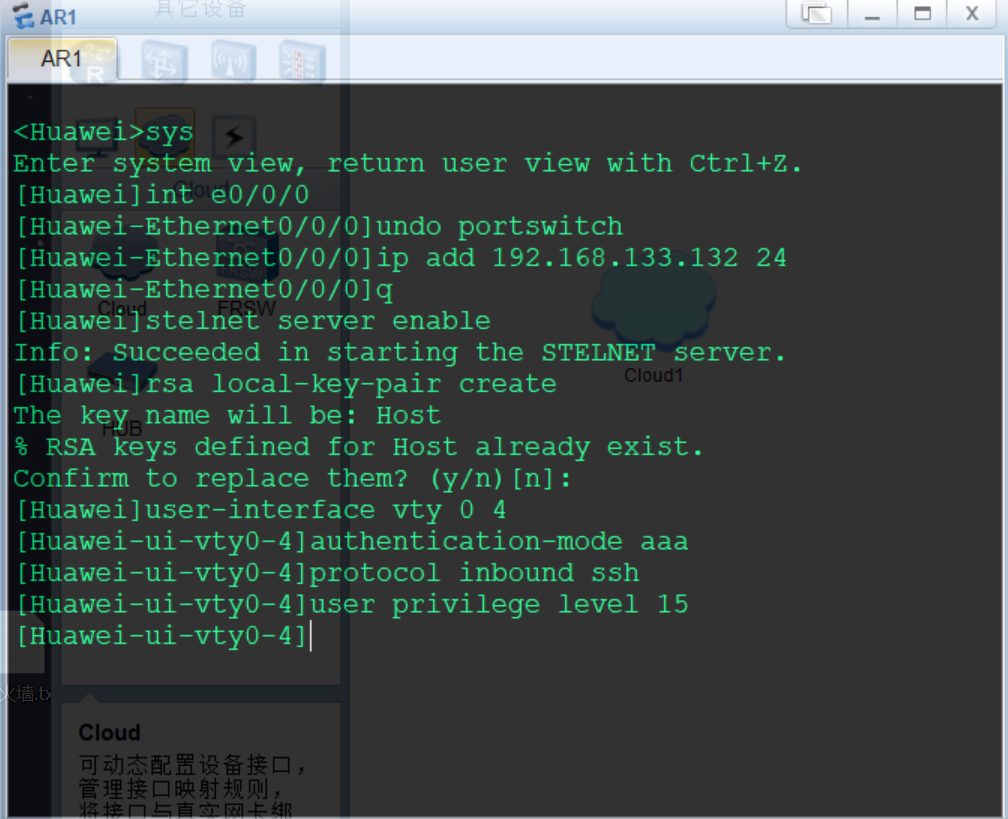
按以下脚本配置ssh登录用户
# 进入AAA认证模式
aaa
# 创建用户 admin,密码 Huawei@123 (cipher 是加密显示)
local-user sshuser password cipher Huawei@123
# 允许该用户使用 SSH
local-user sshuser service-type ssh
q
# 允许第一次ssh登录
ssh client first-time enable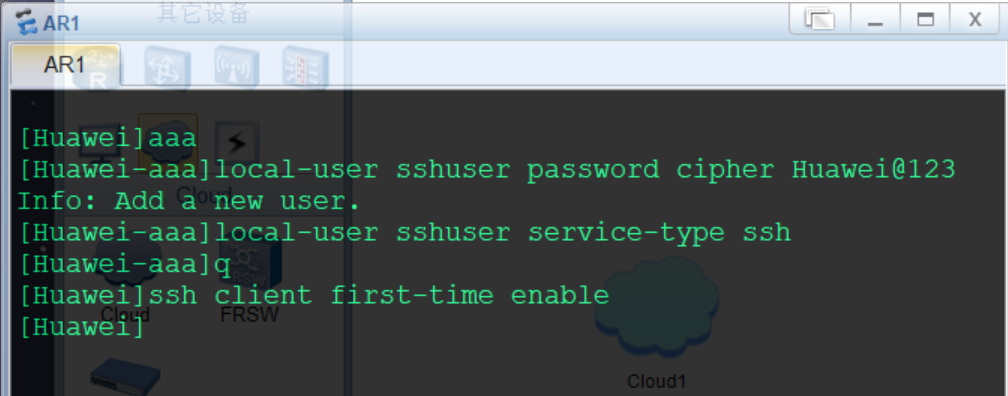
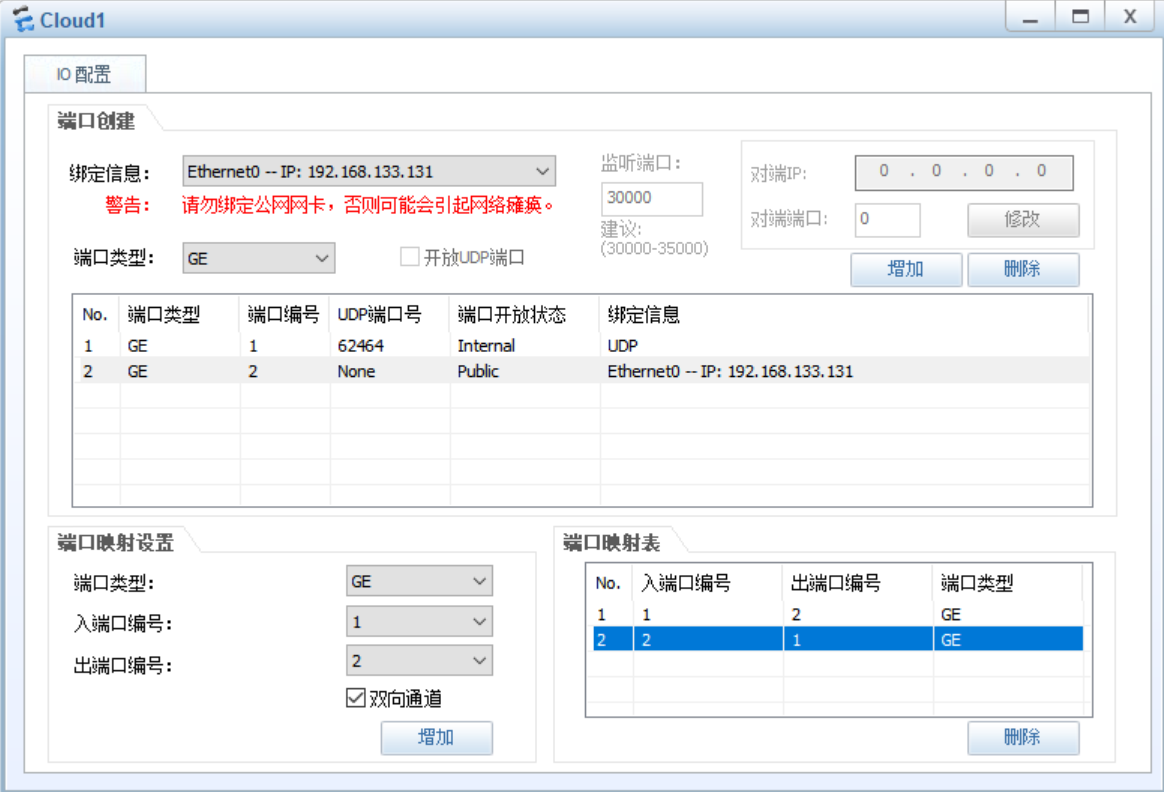
左键双击Cloud1配置Cloud设备
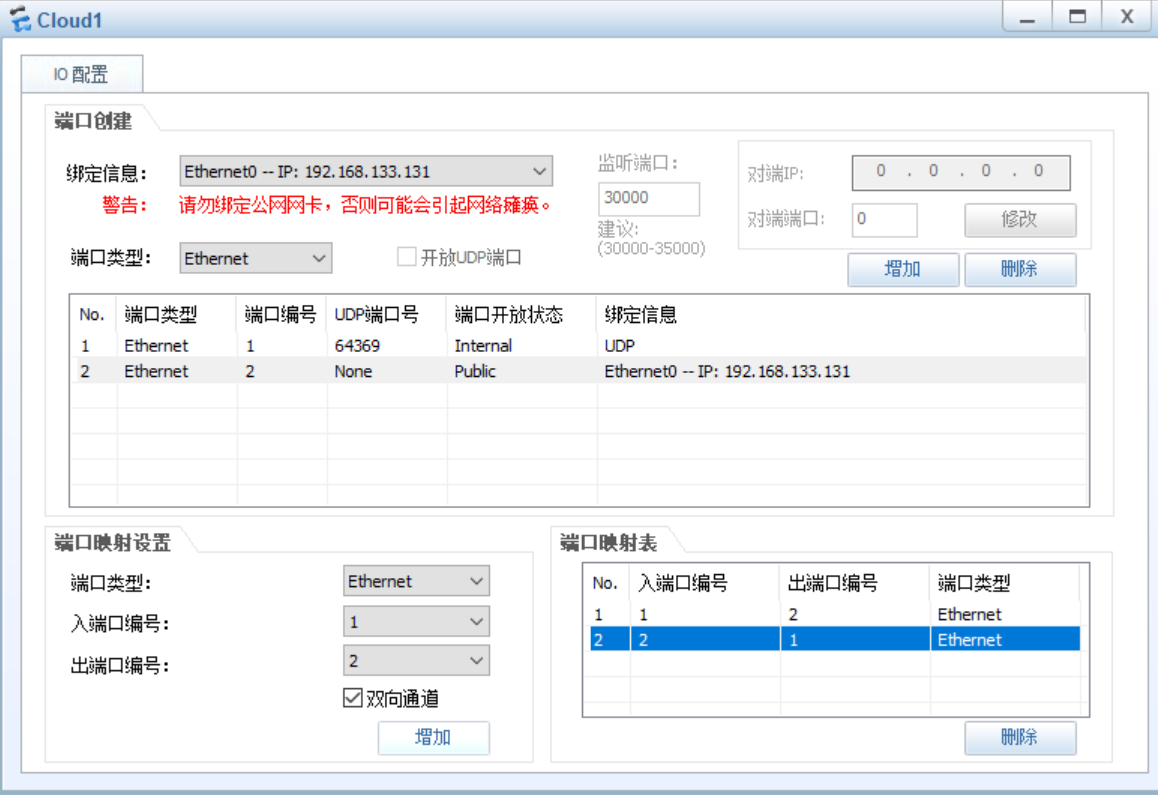
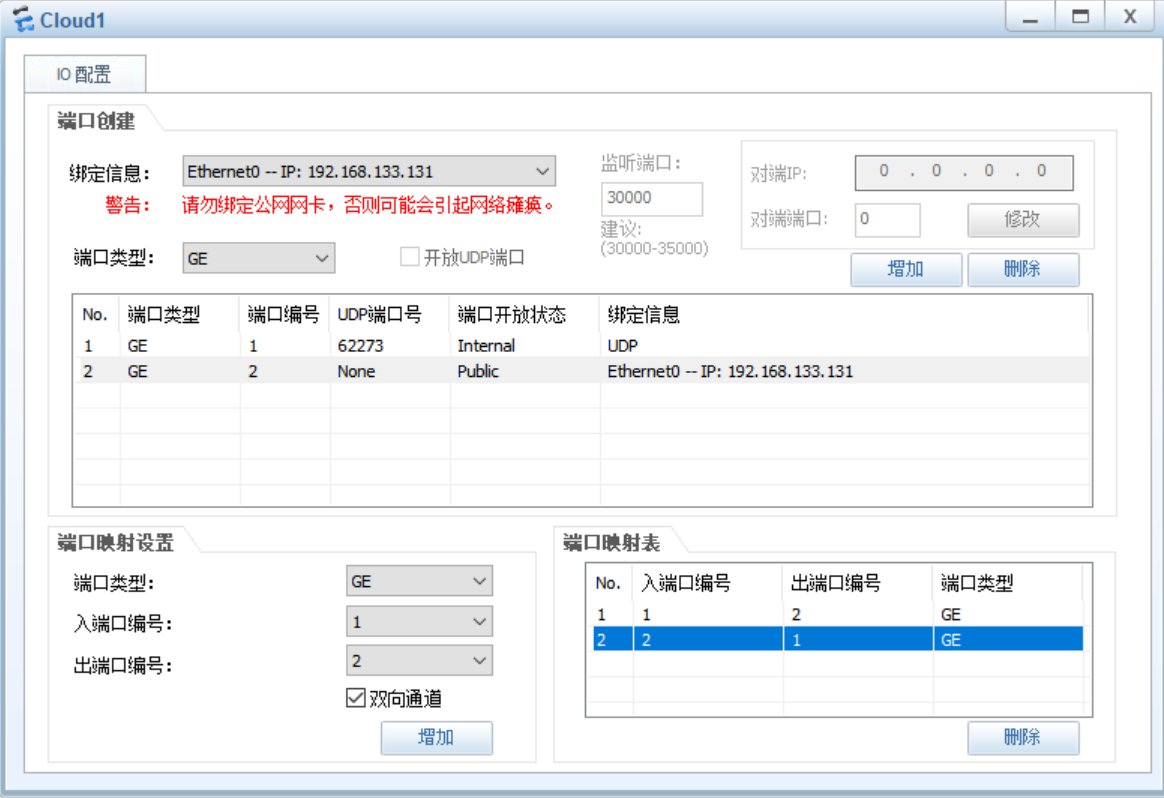
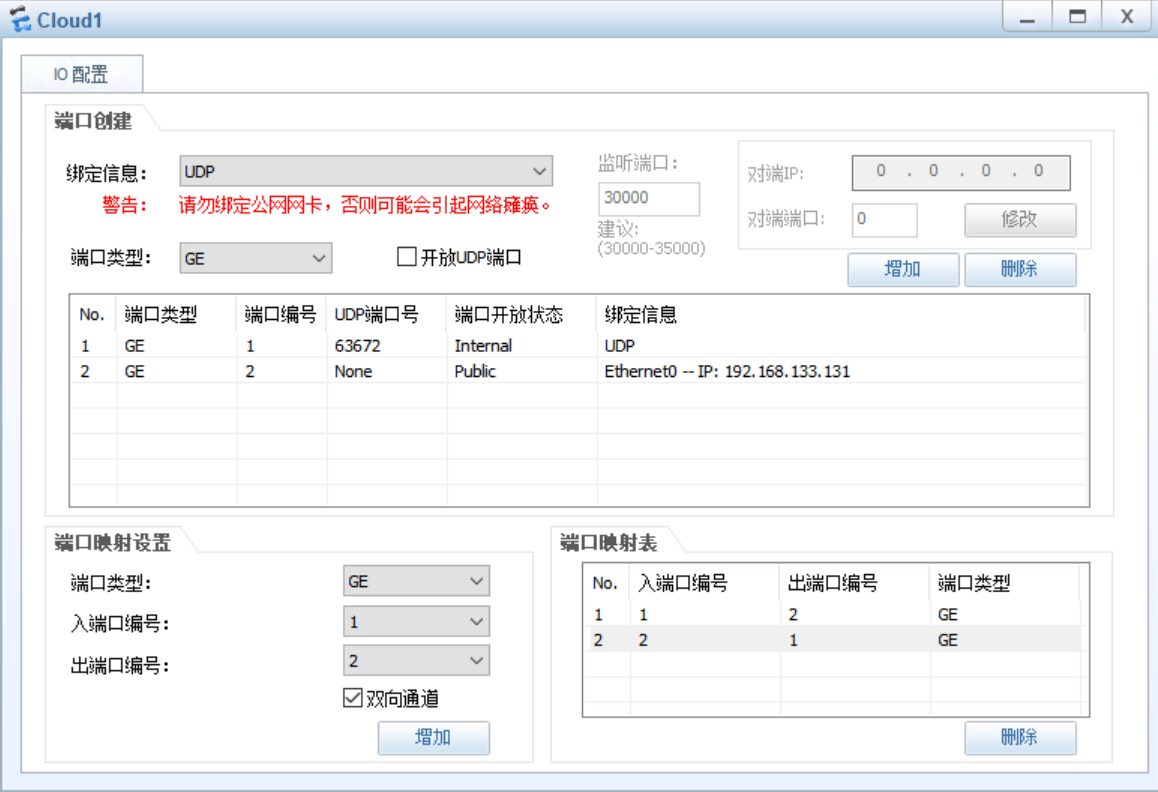
# 1、绑定UDP端口,端口类型Ethernet(根据需要连接的设备接口进行选择,如AR201开启的接口为Ethernet0/0/0,则端口类型选择Ethernet类型,如NE40E开启的接口为GEthernet1/0/0,则端口类型选择GE)
# 2、绑定本地网卡Ethernet0 -- IP: 192.168.133.131,端口类型选择与上述一致(这里本地网卡指运行eNSP的虚拟机的网卡,网段与物理主机一致)
# 3、添加出入口端口双向通道
# 4、完成后关闭页面即可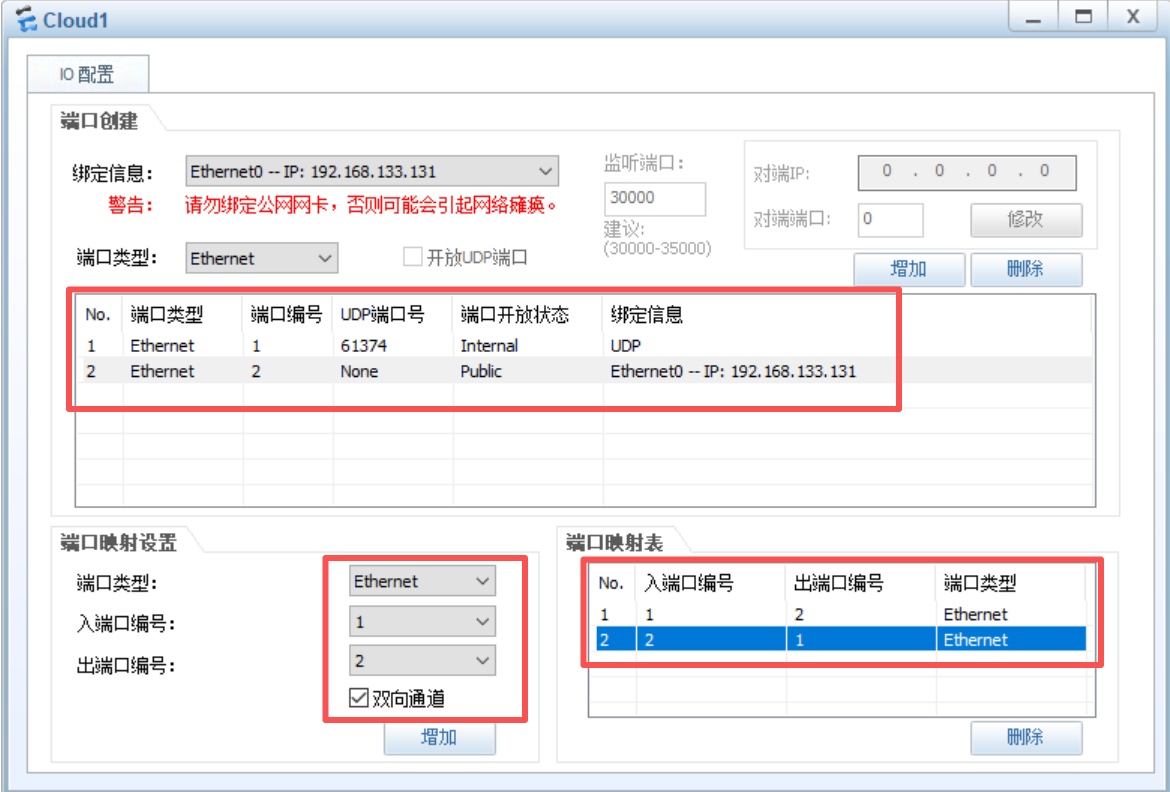
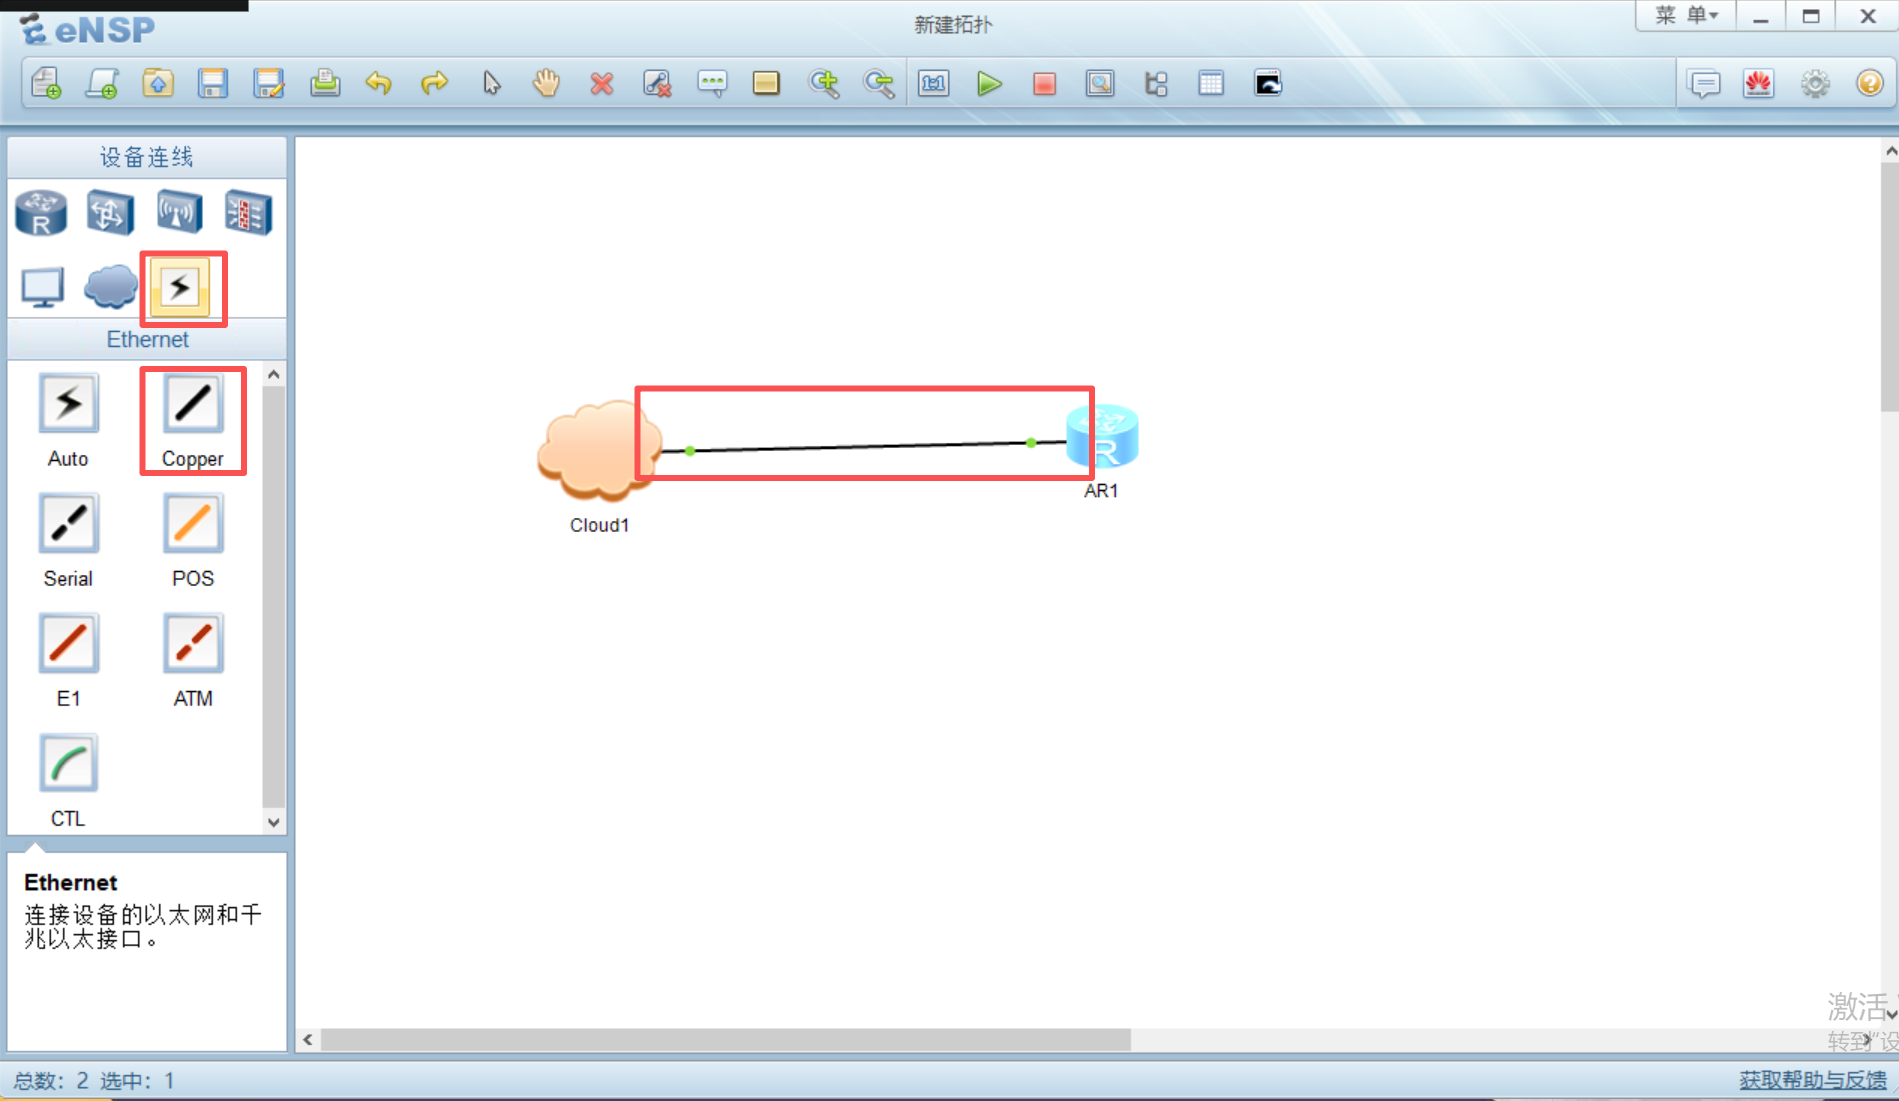
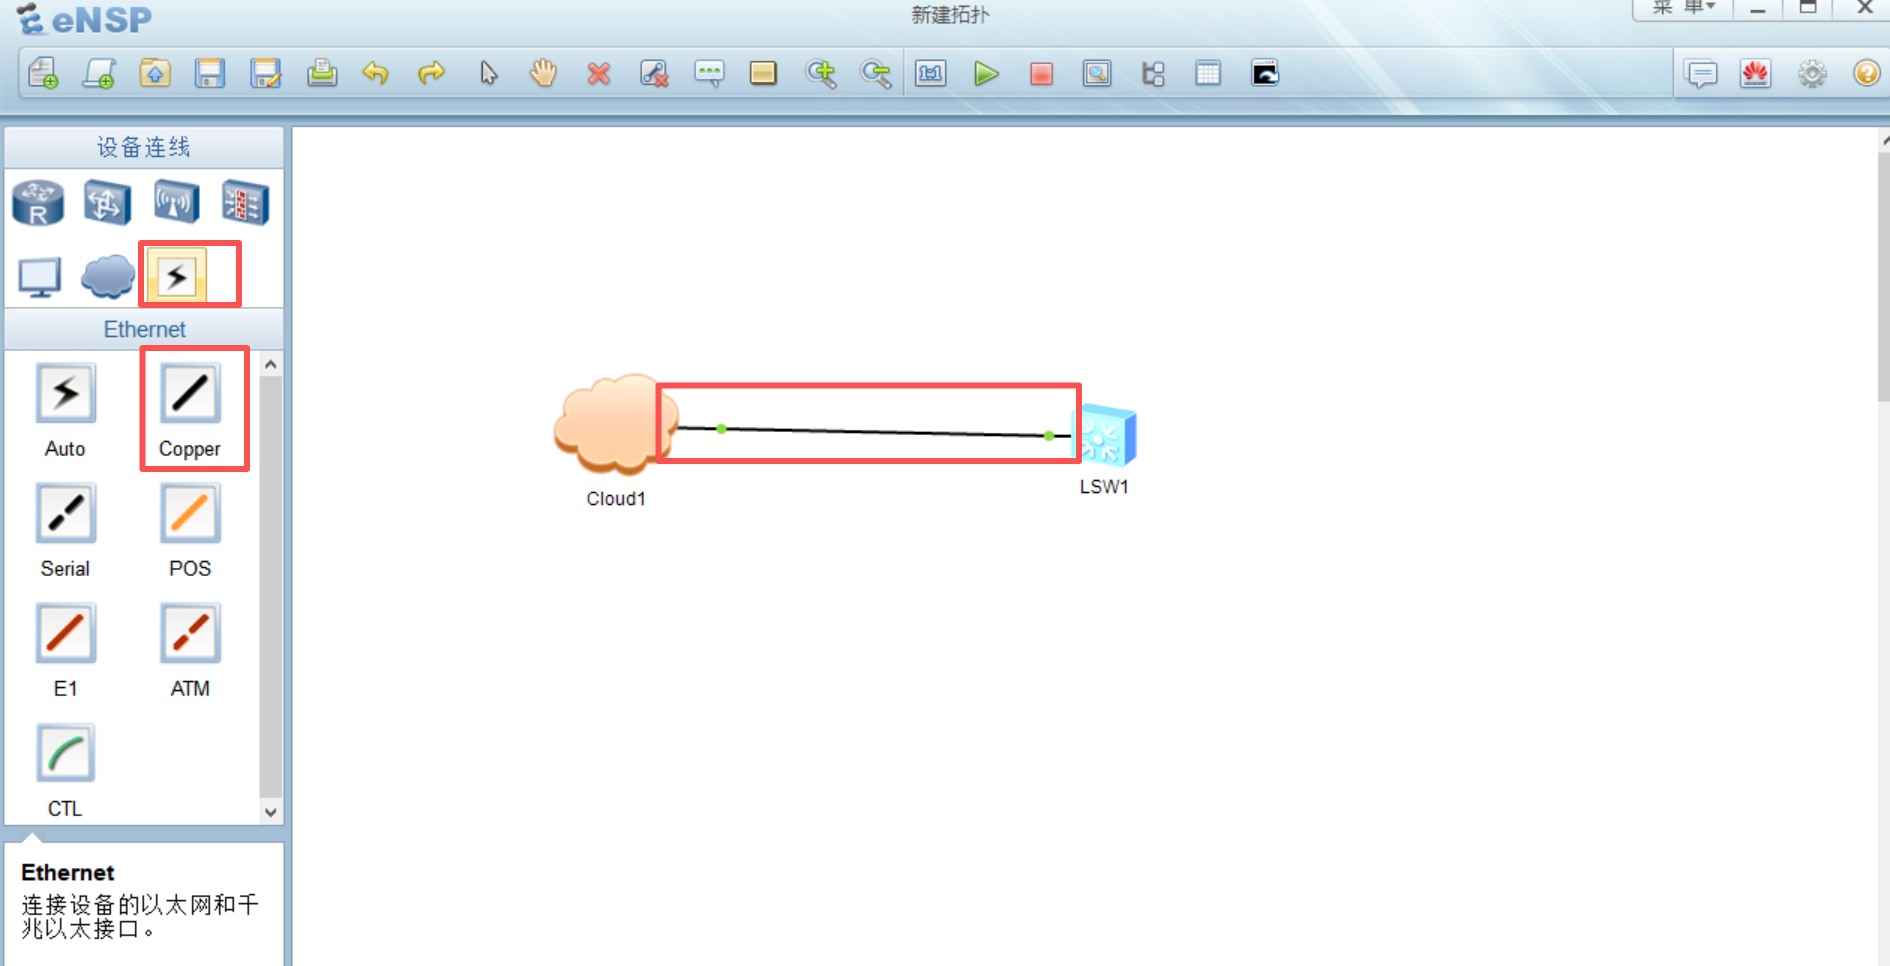
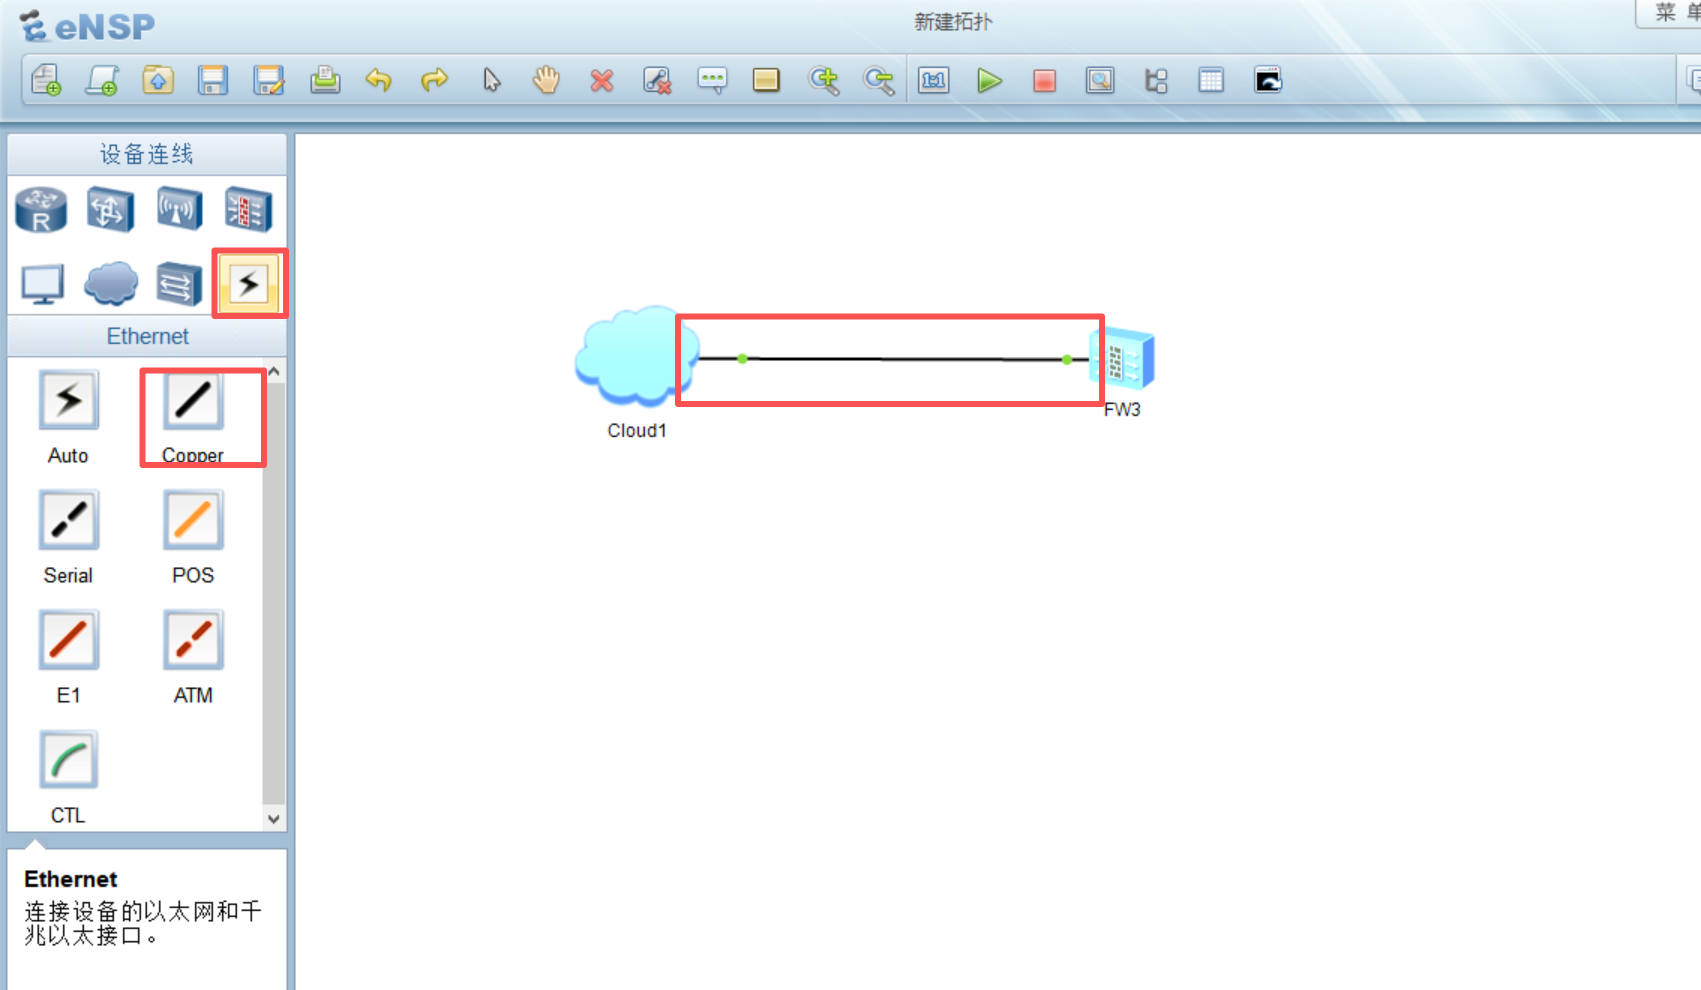
使用Copper连接Cloud1设备Eth0/0/1接口和AR1设备Eth0/0/0接口,接口绿色为正常
进入AR1设备终端,先ping网关,192.168.133.2,能通则网络正常(如果不通,可能是网段中有其他设备使用了vpn,应关闭,也可使用
dis arp命令查看arp表)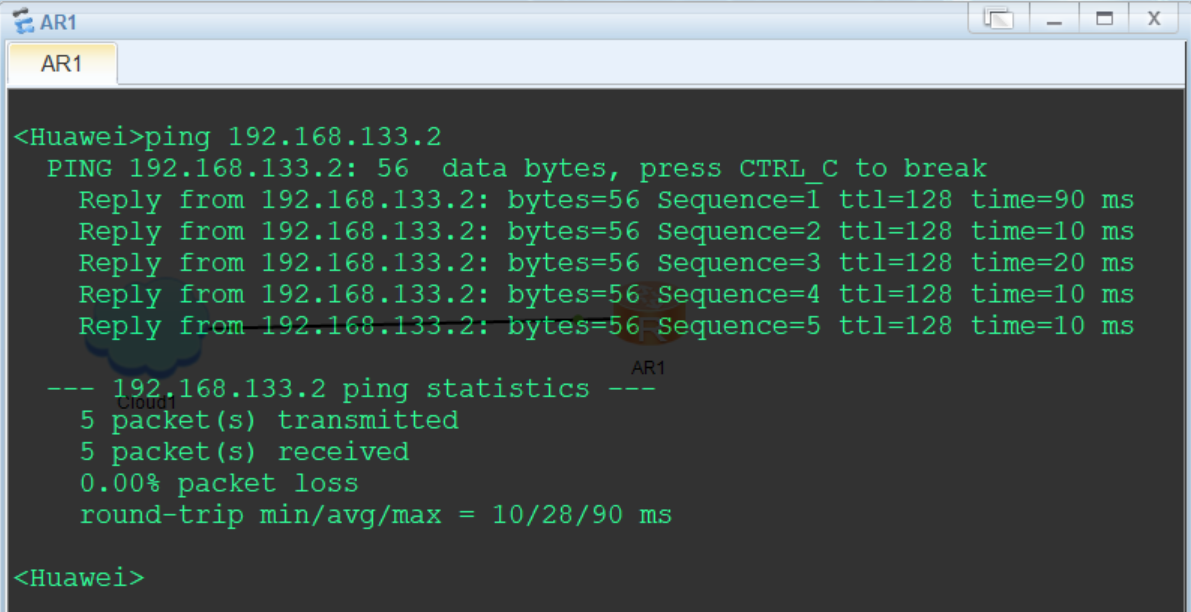
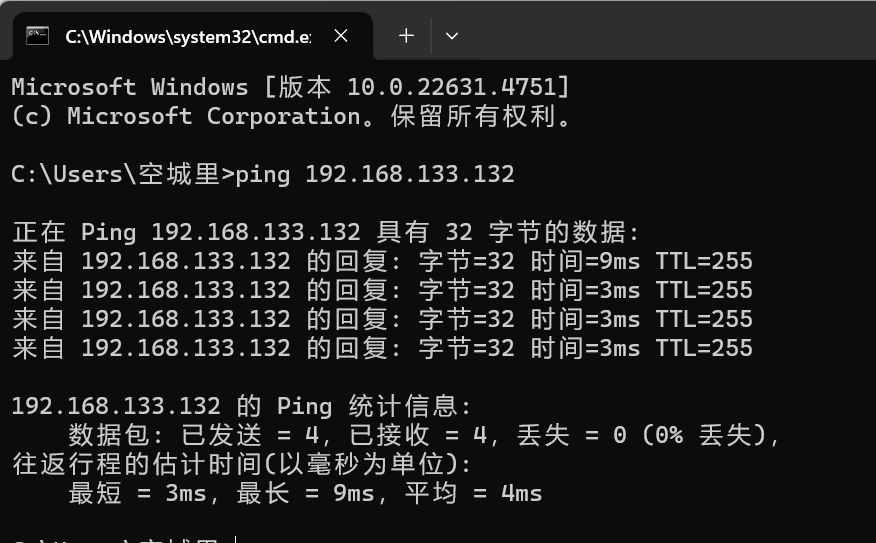
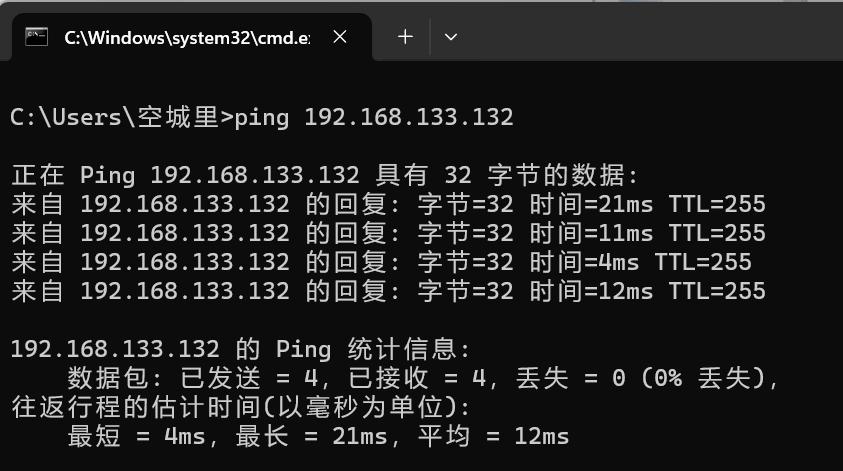
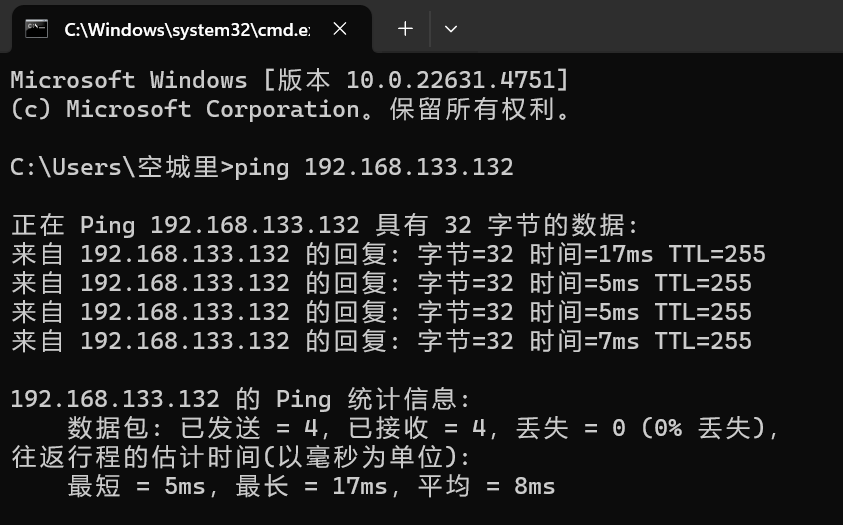
在物理主机ping路由器AR1,192.168.133.132,正常即可进行ssh连接测试
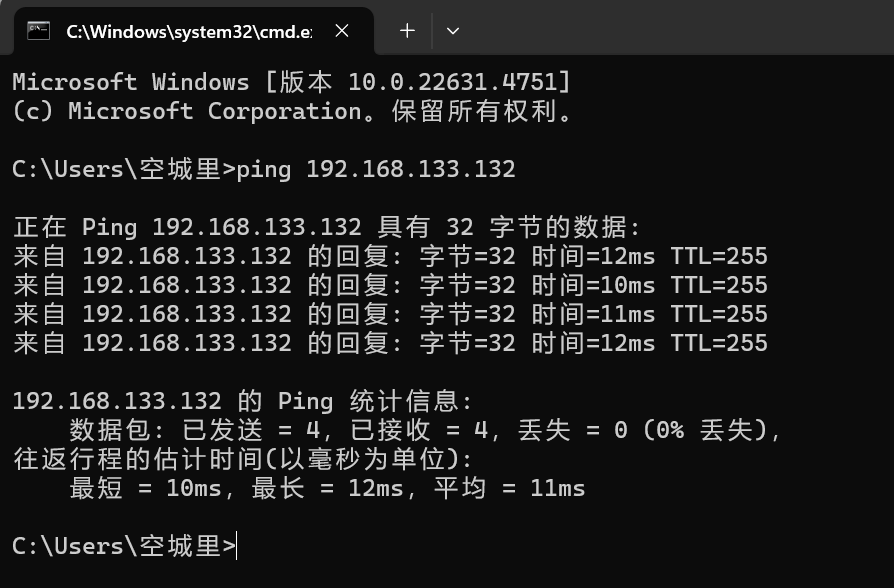
测试结果如下,正常调用
display version命令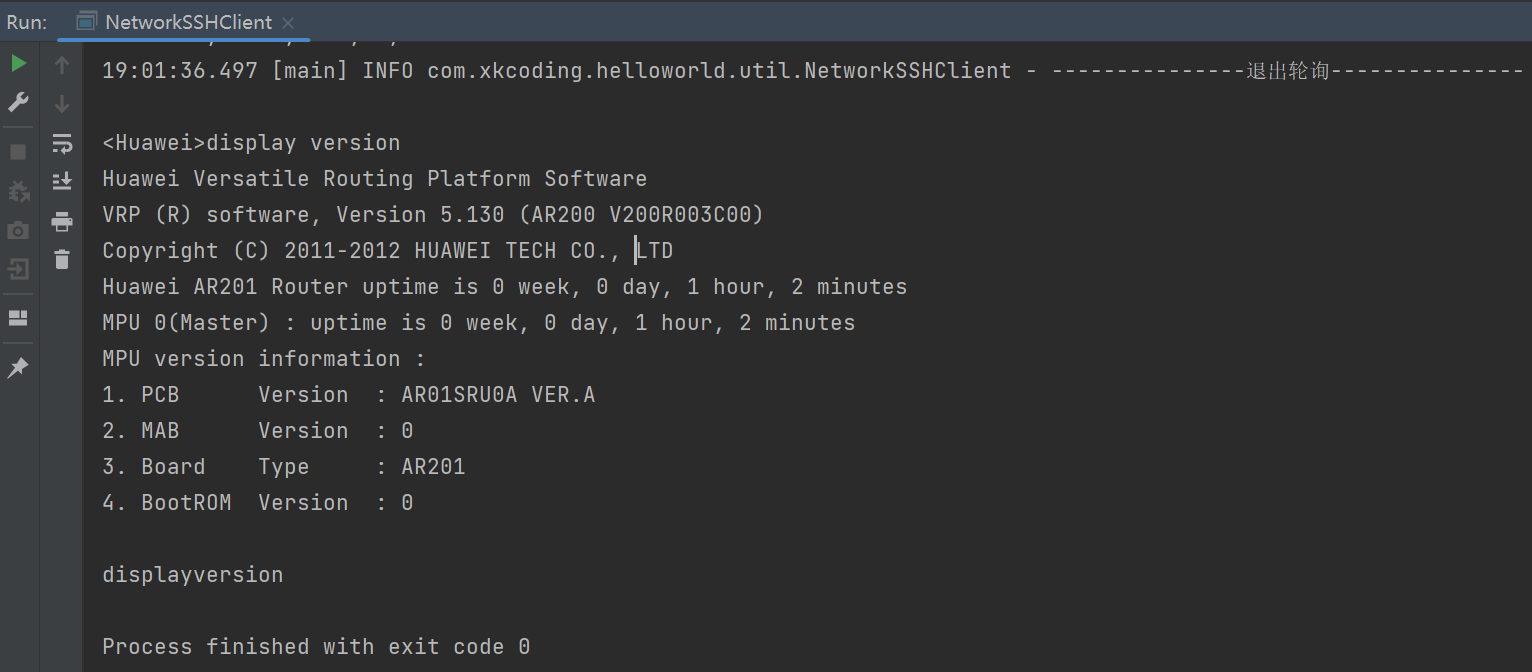
NE40E
较新设备,以NE40E为例
拓扑编辑参考路由器AR201设备,以下从设备配置开始
左键双击NE40E路由器打开终端,等待启动完成(出现<Huawei>表示启动完成,如果终端一直输出#,可以去virtualBox的NE40E虚拟机终端敲几下回车,或者先停止设备,再启动设备)
按以下脚本配置接口及ssh登录服务
sys
int Ethernet1/0/0
ip add 192.168.133.132 24
commit
q
stelnet server enable
rsa local-key-pair create
user-interface vty 0 4
authentication-mode aaa
protocol inbound ssh
user privilege level 3
commit
q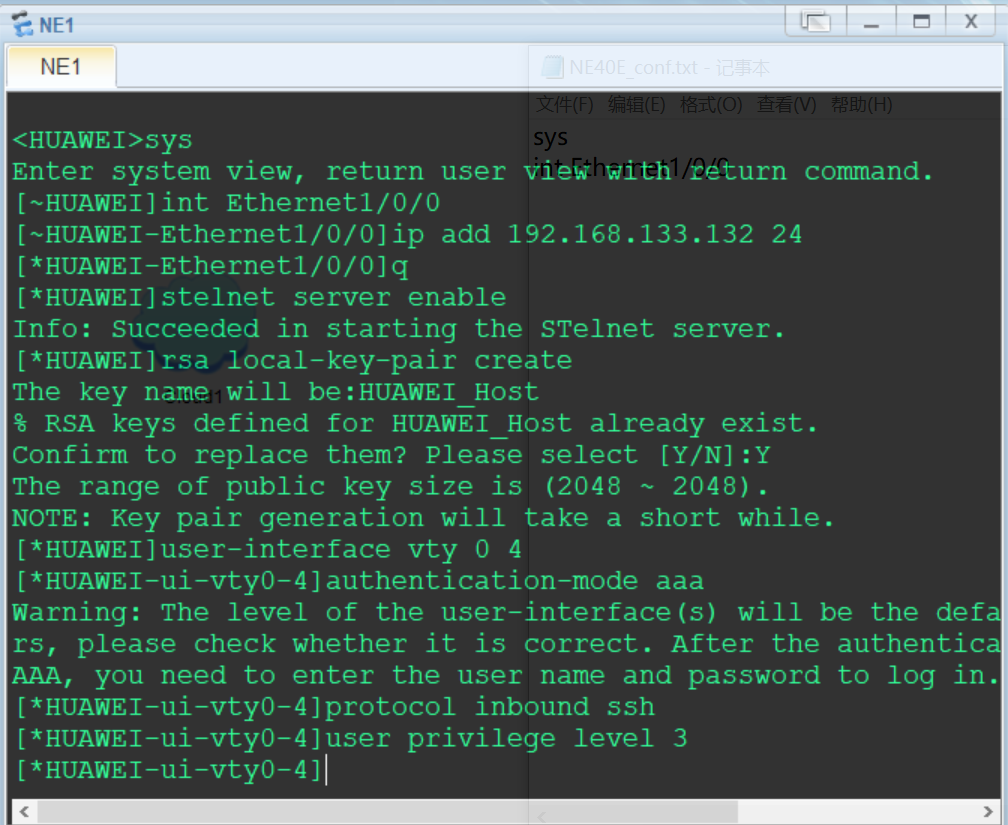
按以下脚本配置ssh登录用户
aaa
local-user sshuser password cipher Huawei@123
local-user sshuser service-type ssh
commit
q
ssh client first-time enable
commit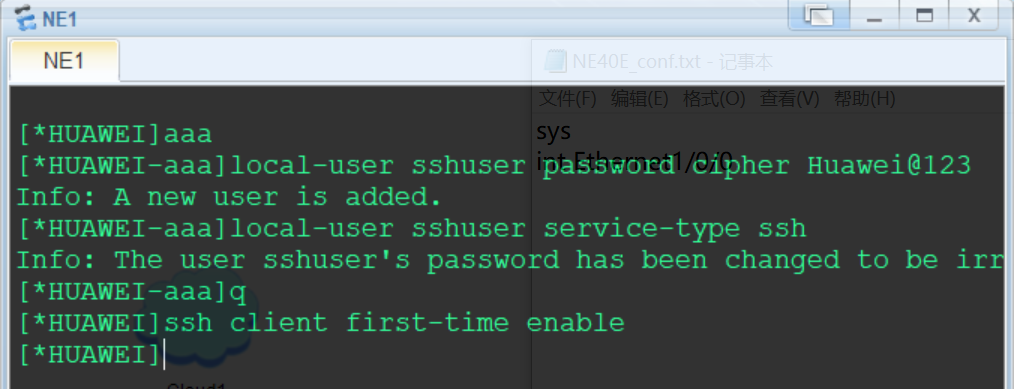
按以下配置Cloud
使用Copper连接Cloud1设备Eth0/0/1接口和NE40E设备Eth1/0/0接口,接口绿色为正常
进入NE40E设备终端,先ping网关,192.168.133.2,能通则网络正常(如果不通,可能是网段中有其他设备使用了vpn,应关闭,也可使用
dis arp命令查看arp表)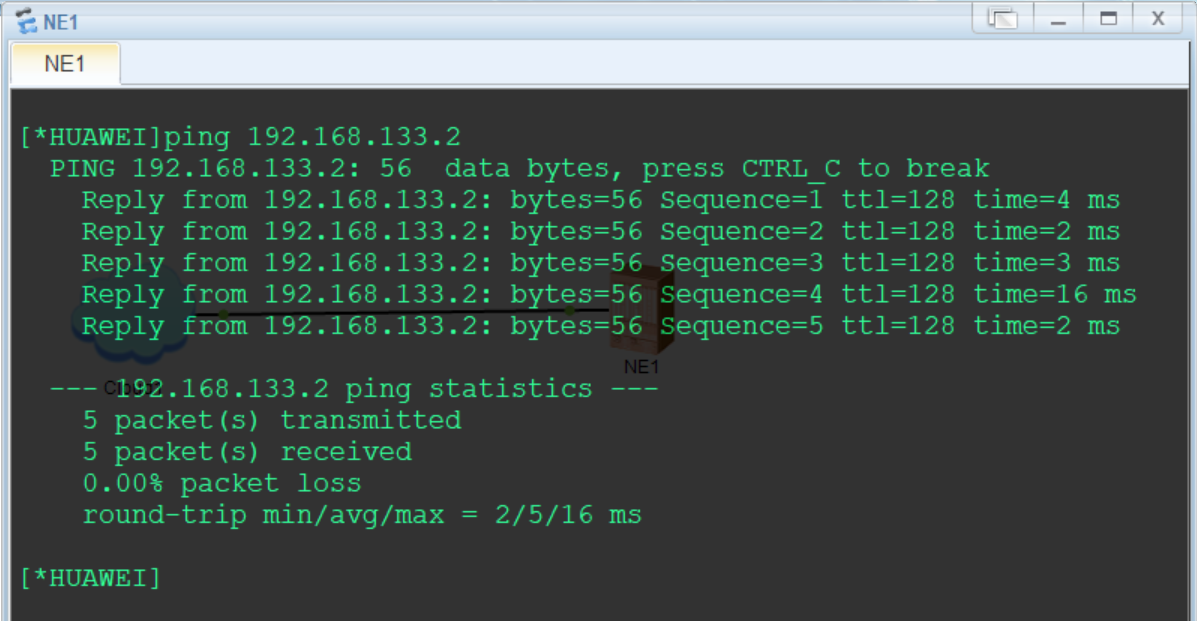
NE40E设备首次登录需要修改ssh用户密码,先在终端使用stelnet连接
stelnet 192.168.133.132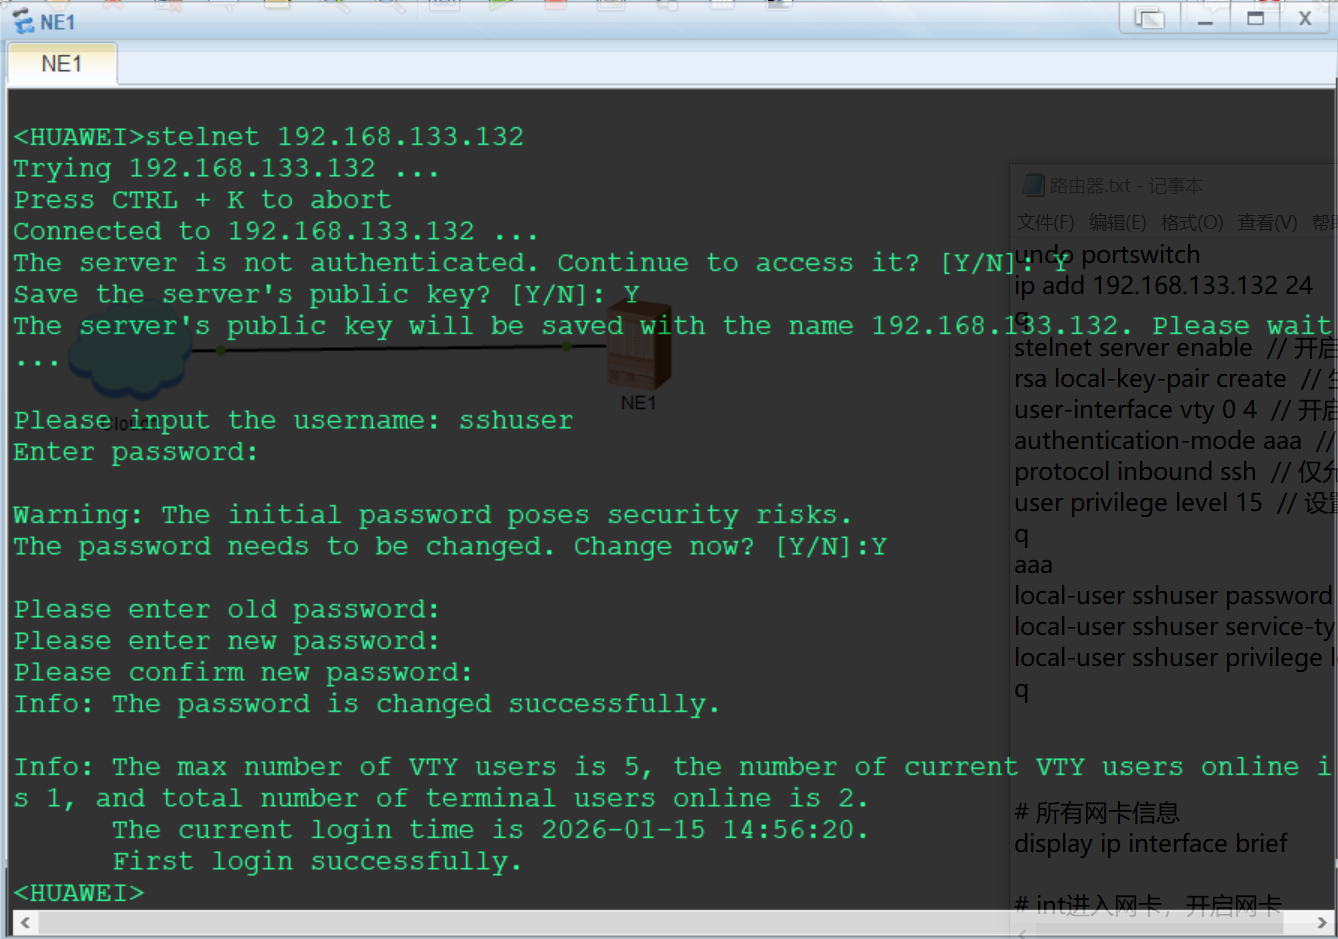
在物理主机ping路由器AR1,192.168.133.132,正常即可进行ssh连接测试
测试结果如下,正常调用
display version命令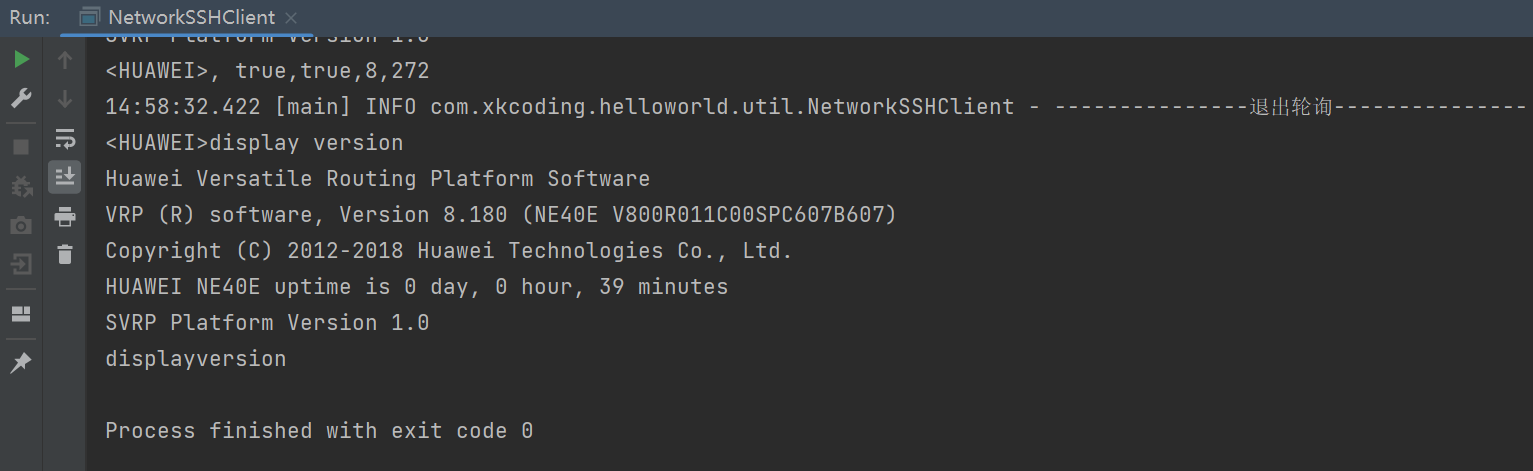
交换机
S5700
较旧设备,以S5700为例
拓扑编辑参考路由器AR201设备,以下从设备配置开始
左键双击S5700交换机打开终端,等待启动完成(出现<Huawei>表示启动完成)
按以下脚本配置接口及ssh登录服务
# 因为S5700默认开启了vlan1接口,所以将ip配在vlan1,关联二层ge0/0/1接口,后面用ge0/0/1接口与cloud连接
sys
vlan 1
q
int vlan 1
ip add 192.168.133.132 24
q
int g0/0/1
portswitch
port link-type access
port default vlan 1
q
stelnet server enable
rsa local-key-pair create
user-interface vty 0 4
authentication-mode aaa
protocol inbound ssh
user privilege level 15
q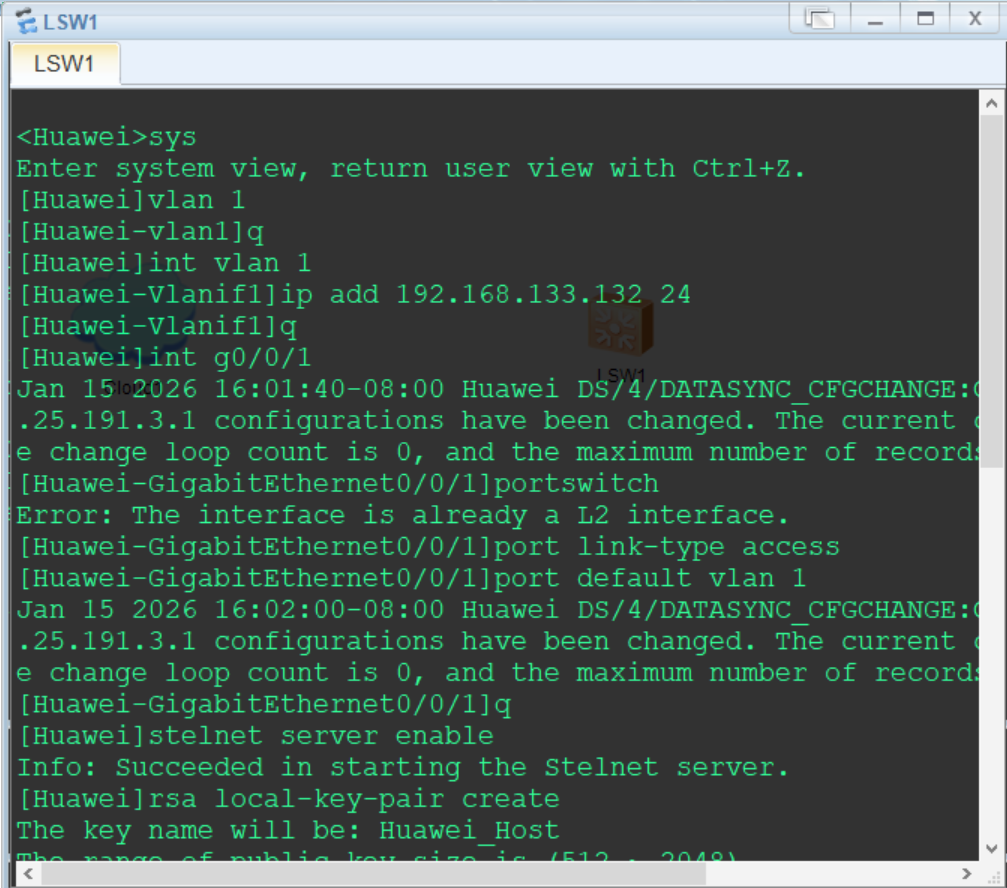
按以下脚本配置ssh登录用户
ssh user sshuser
ssh user sshuser service-type stelnet
ssh user sshuser authentication-type password
aaa
local-user sshuser password cipher Huawei@123
local-user sshuser service-type ssh
q
ssh client first-time enable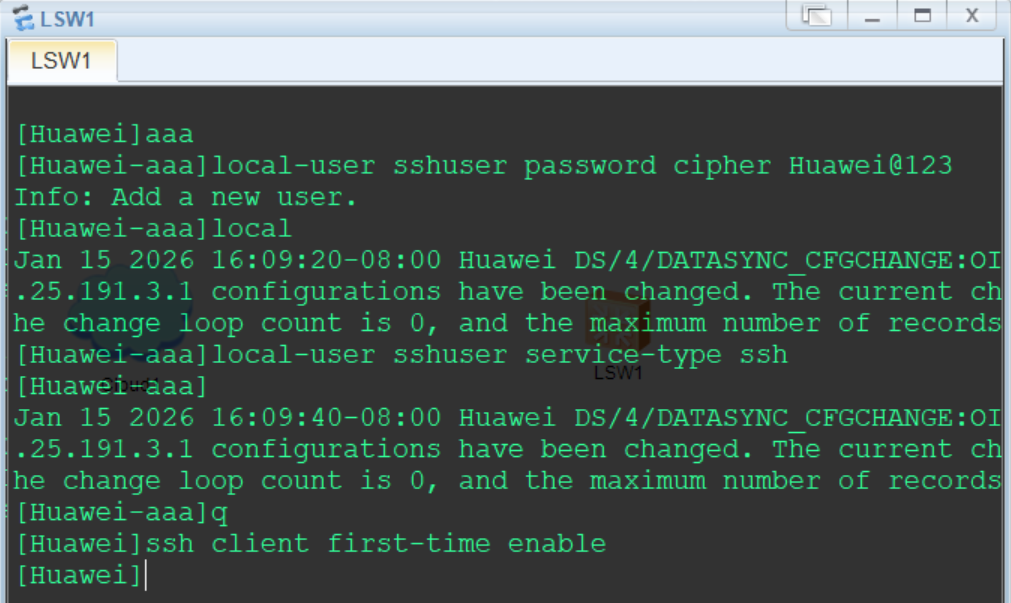
按以下配置Cloud
使用Copper连接Cloud1设备Eth0/0/1接口和S5700设备GE1/0/0接口,接口绿色为正常
进入S5700设备终端,先ping网关,192.168.133.2,能通则网络正常(如果不通,可能是网段中有其他设备使用了vpn,应关闭,也可使用
dis arp命令查看arp表)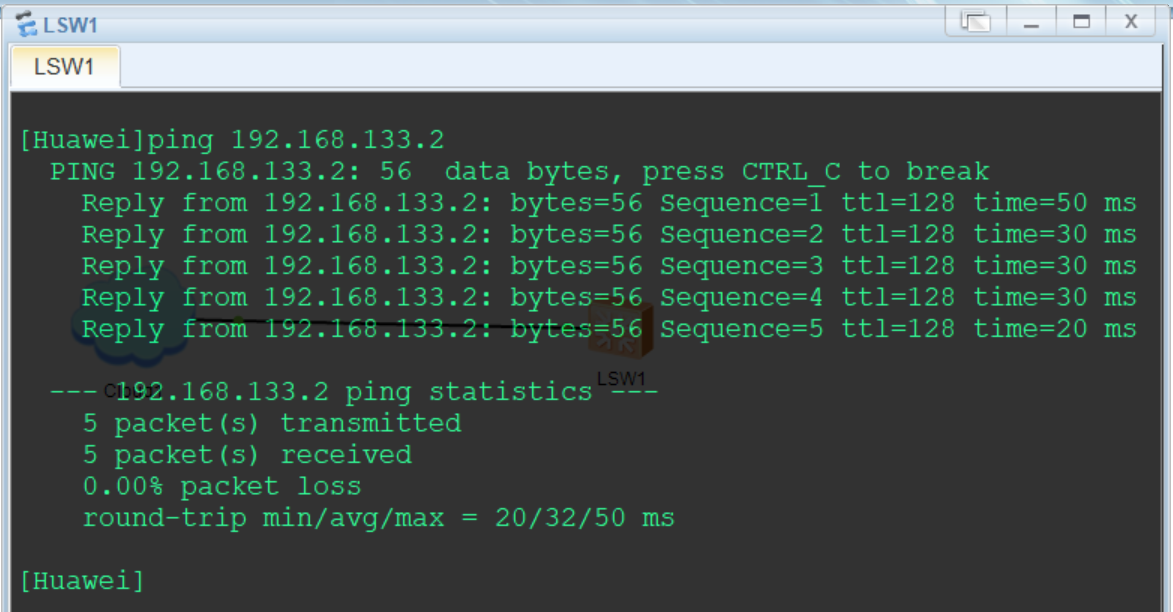
在物理主机ping交换机S5700,192.168.133.132,正常即可进行ssh连接测试
测试结果如下,正常调用
display version命令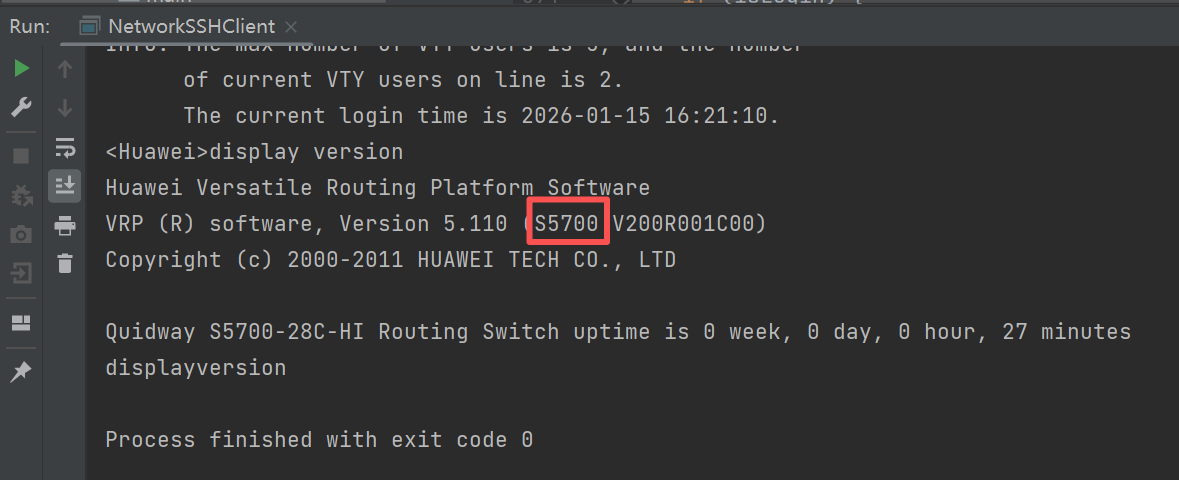
CE12800
较新设备,以CE12800为例
拓扑编辑参考路由器AR201设备,以下从设备配置开始
左键双击CE12800交换机打开终端,等待启动完成(出现<Huawei>表示启动完成,如果终端一直输出#,可以去virtualBox的CE12800虚拟机终端敲几下回车,或者先停止设备,再启动设备)
按以下脚本配置接口及ssh登录服务
sys
int g1/0/0
undo portswith
undo shutdown
ip add 192.168.133.132 24
commit
q
stelnet server enable
rsa local-key-pair create
user-interface vty 0 4
authentication-mode aaa
protocol inbound ssh
user privilege level 3
q
commit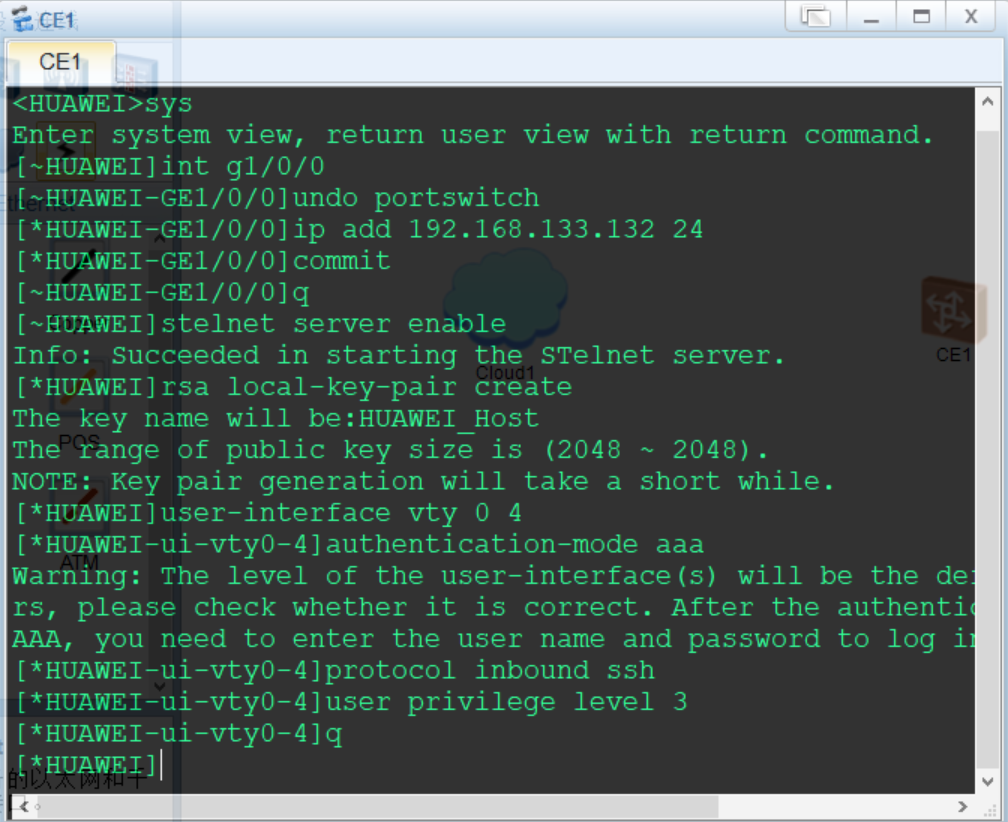
按以下脚本配置ssh登录用户
aaa
local-user sshuser password cipher Huawei@123
local-user sshuser service-type ssh
commit
q
ssh client first-time enable
commit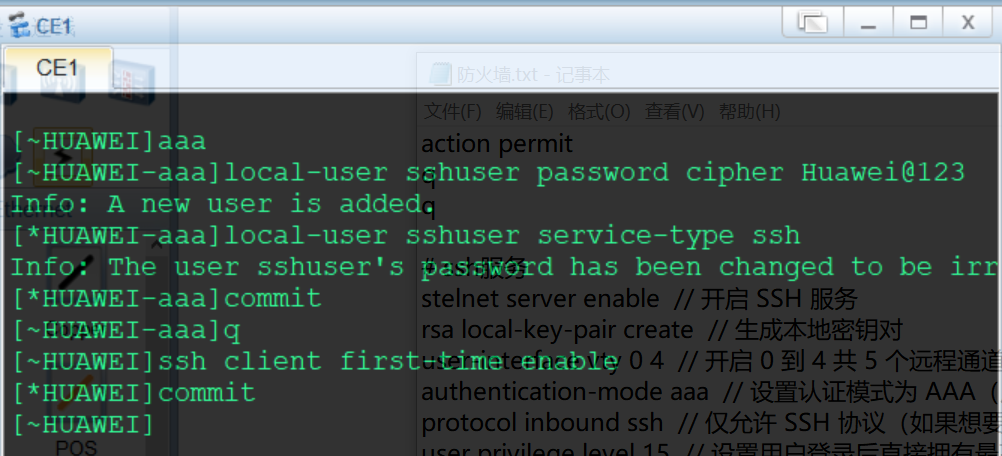
按以下配置Cloud
使用Copper连接Cloud1设备Eth0/0/1接口和CE12800设备GE1/0/0接口,接口绿色为正常
进入CE12800设备终端,先ping网关,192.168.133.2,能通则网络正常(如果不通,可能是网段中有其他设备使用了vpn,应关闭,也可使用
dis arp命令查看arp表)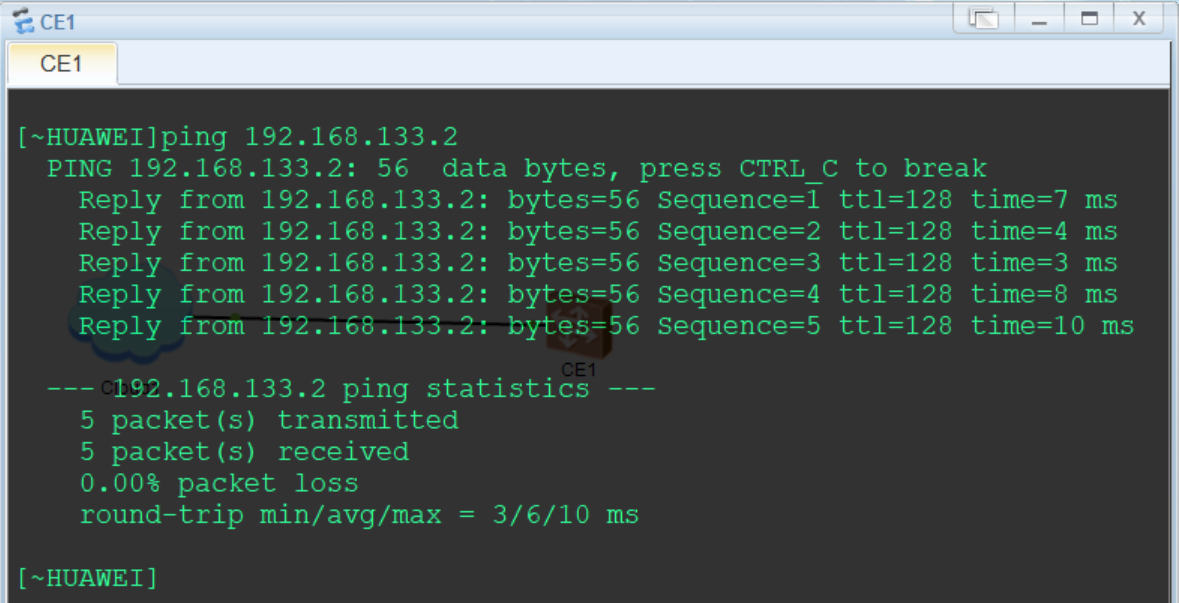
CE12800设备首次登录需要修改ssh用户密码,先在终端使用stelnet连接
stelnet 192.168.133.132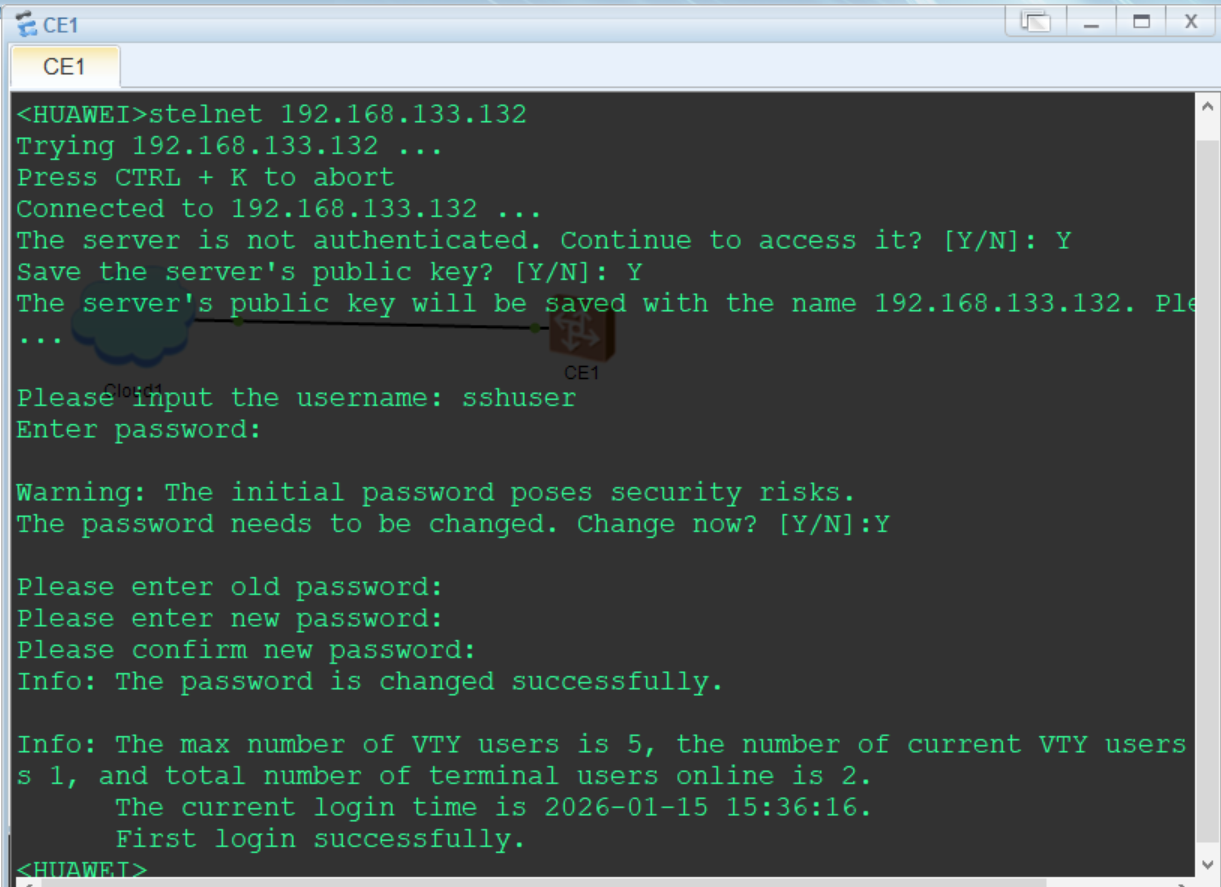
在物理主机ping交换机CE12800,192.168.133.132,正常即可进行ssh连接测试
测试结果如下,正常调用
display version命令
防火墙
USG5500
目前登录提示数据包异常,暂时无法解决。
USG6000V
拓扑编辑参考路由器AR201设备,以下从设备配置开始
左键双击USG6000V防火墙打开终端,等待启动完成(出现<Huawei>表示启动完成,如果终端一直输出#,可以去virtualBox的USG6000V虚拟机终端敲几下回车,或者先停止设备,再启动设备)(默认用户密码:admin/Admin@123,首次登录需要修改,建议改为Huawei@123)
按以下脚本配置接口及ssh服务
sys
int g1/0/0
undo portswitch
ip add 192.168.133.132 24
service-manage all permit
q
firewall zone trust
add int g1/0/0
q
stelnet server enable
rsa local-key-pair create
user-interface vty 0 4
authentication-mode aaa
protocol inbound ssh
user privilege level 15
q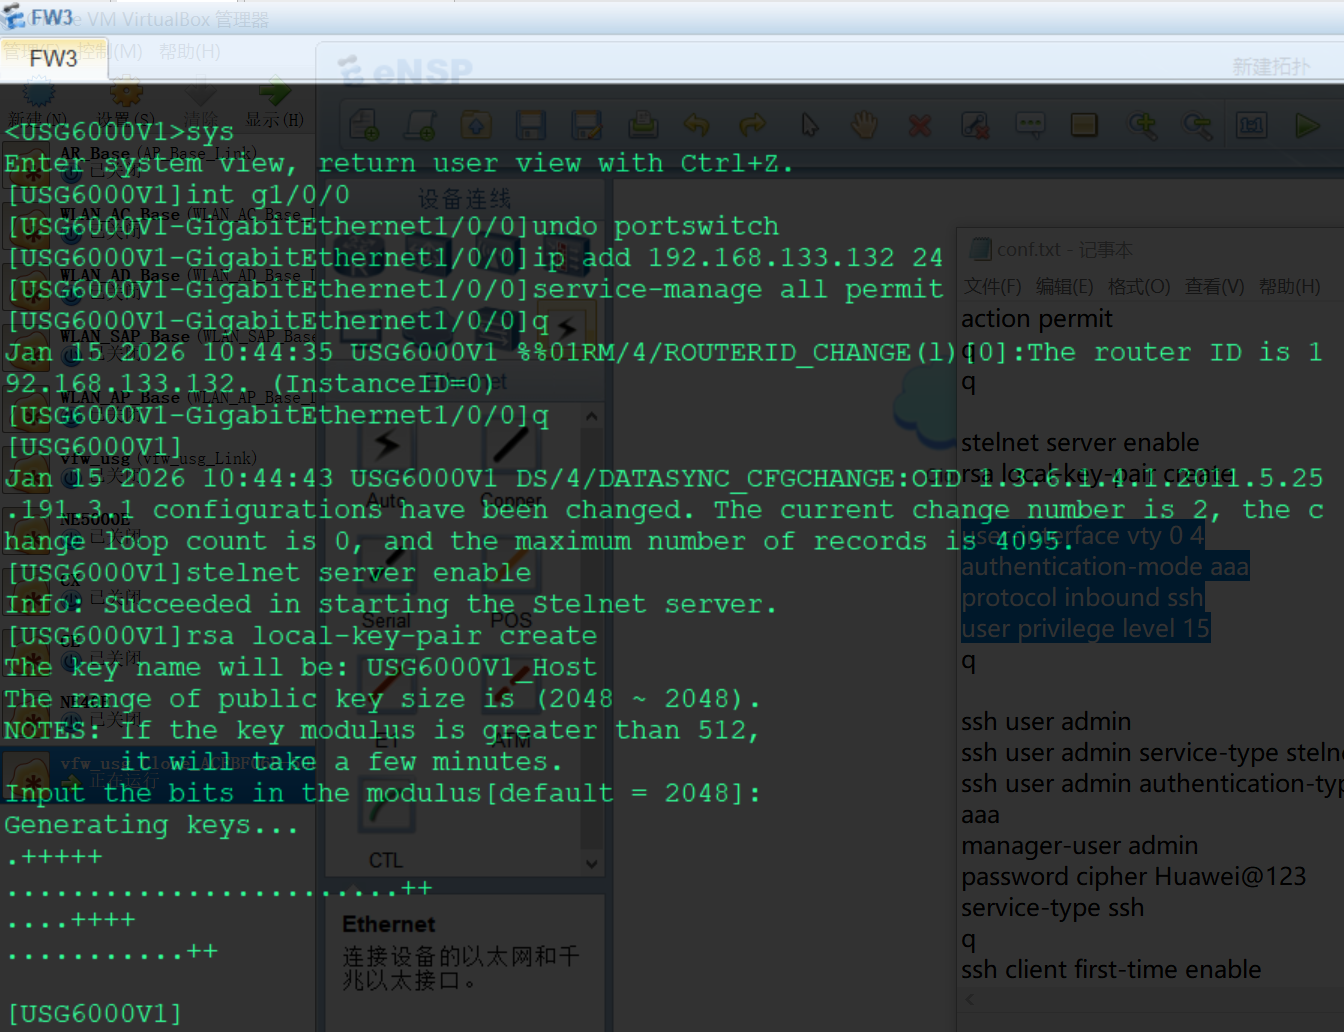
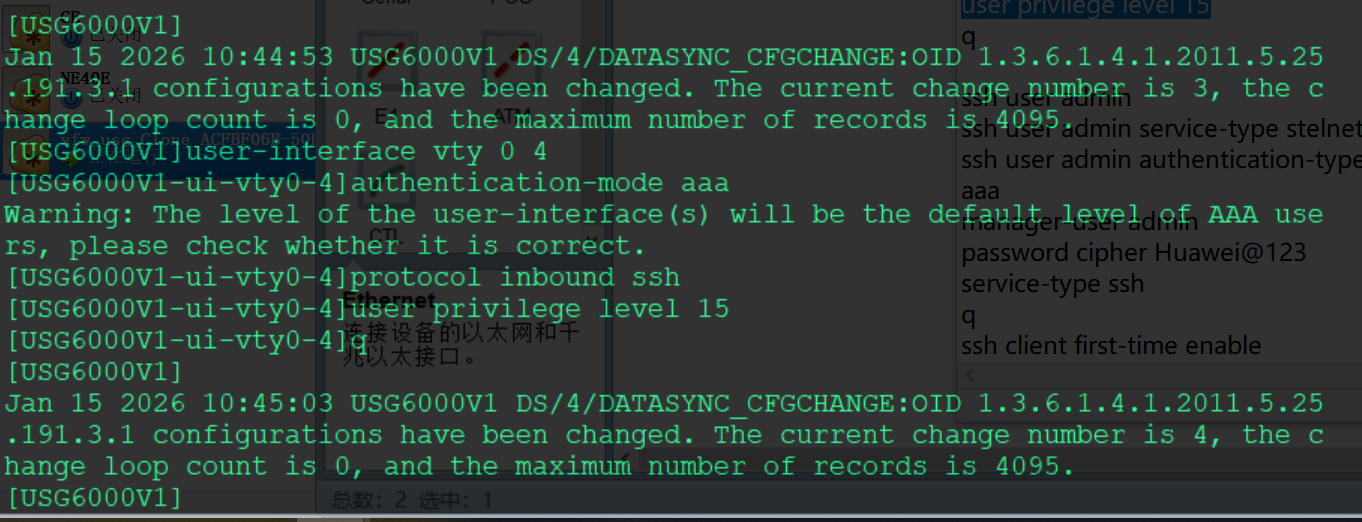
按以下脚本配置防火墙策略
security-policy
rule name Allow_Local_To_Trust
source-zone local
destination-zone trust
source-address 192.168.133.0 24
destination-address 192.168.133.0 24
action permit
q
rule name Allow_Trust_To_Local
source-zone trust
destination-zone local
source-address 192.168.133.0 24
destination-address 192.168.133.0 24
action permit
q
q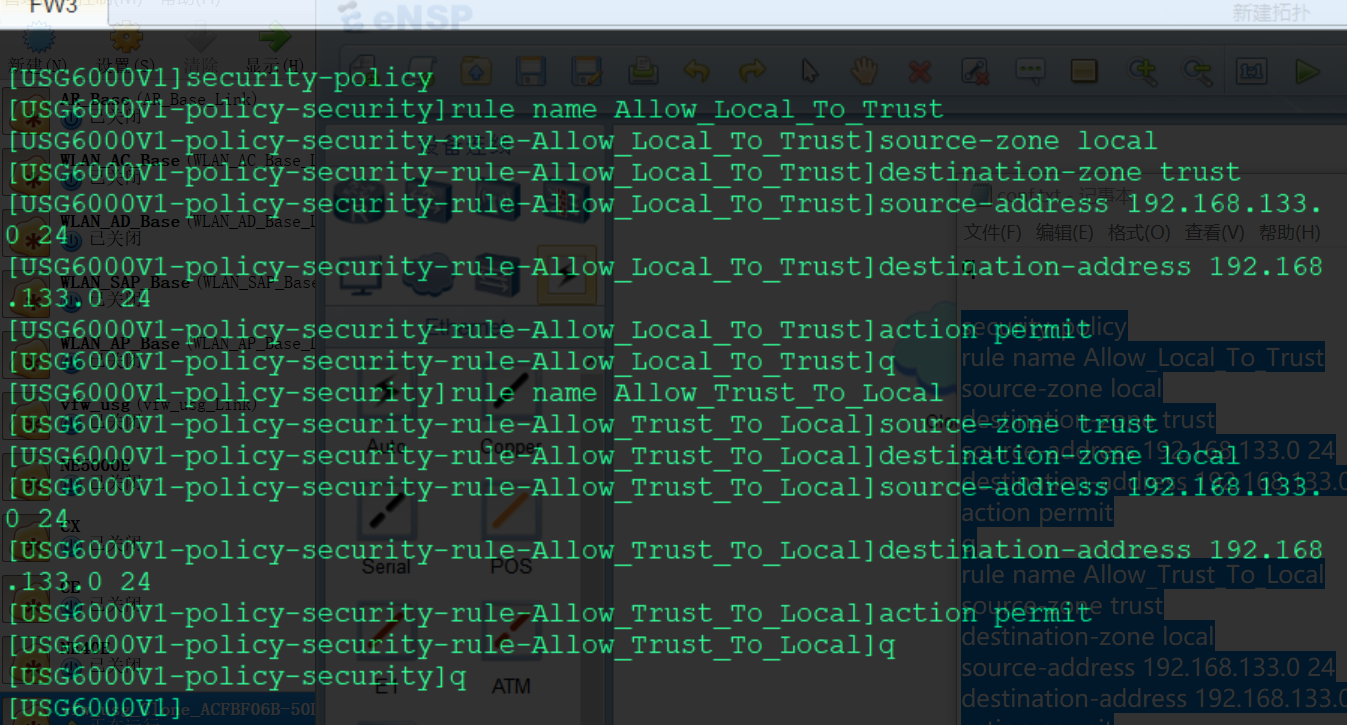
按以下脚本配置ssh登录用户(此处貌似只能配置admin用户,其他用户登不上)
ssh user admin
ssh user admin service-type stelnet
ssh user admin authentication-type password
aaa
manager-user admin
service-type ssh
q
q
ssh client first-time enable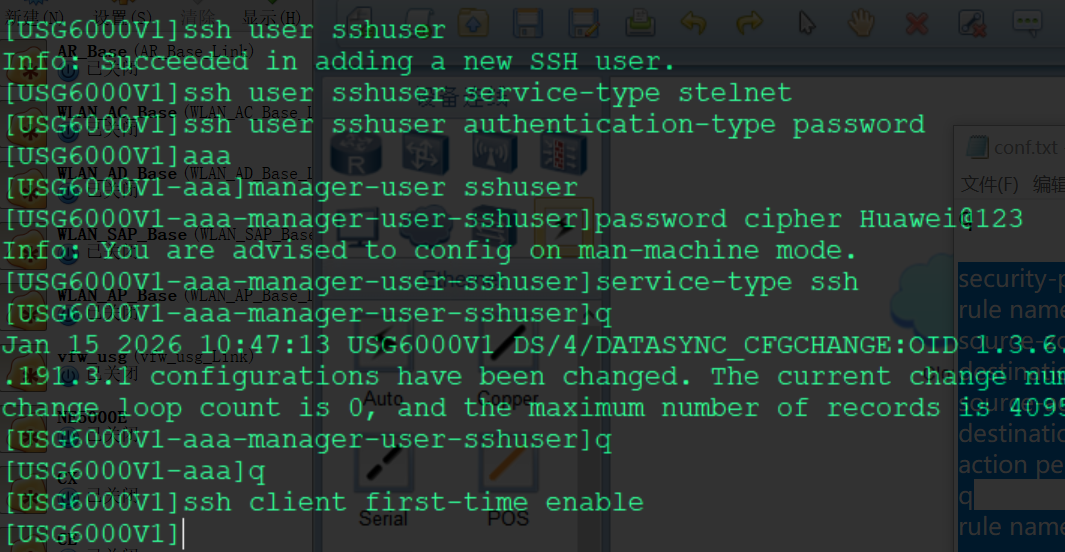
按以下配置Cloud
使用Copper连接Cloud1设备Eth0/0/1接口和USG6000V设备GE1/0/0接口,接口绿色为正常
进入USG6000V设备终端,先ping网关,192.168.133.2,能通则网络正常(如果不通,可能是网段中有其他设备使用了vpn,应关闭,也可使用
dis arp命令查看arp表)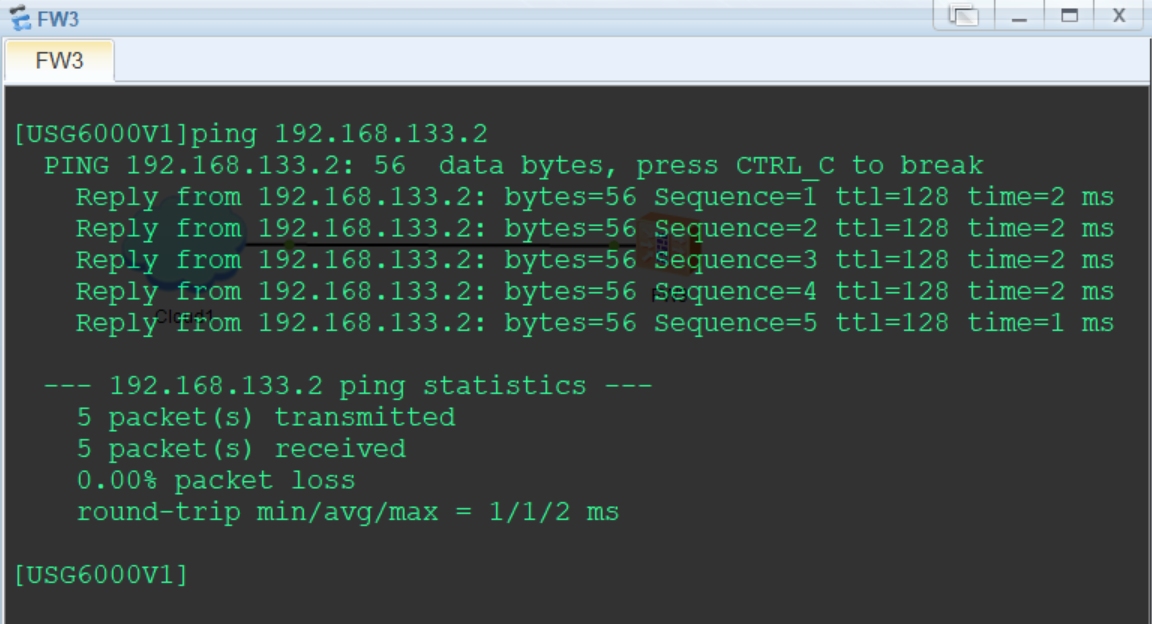
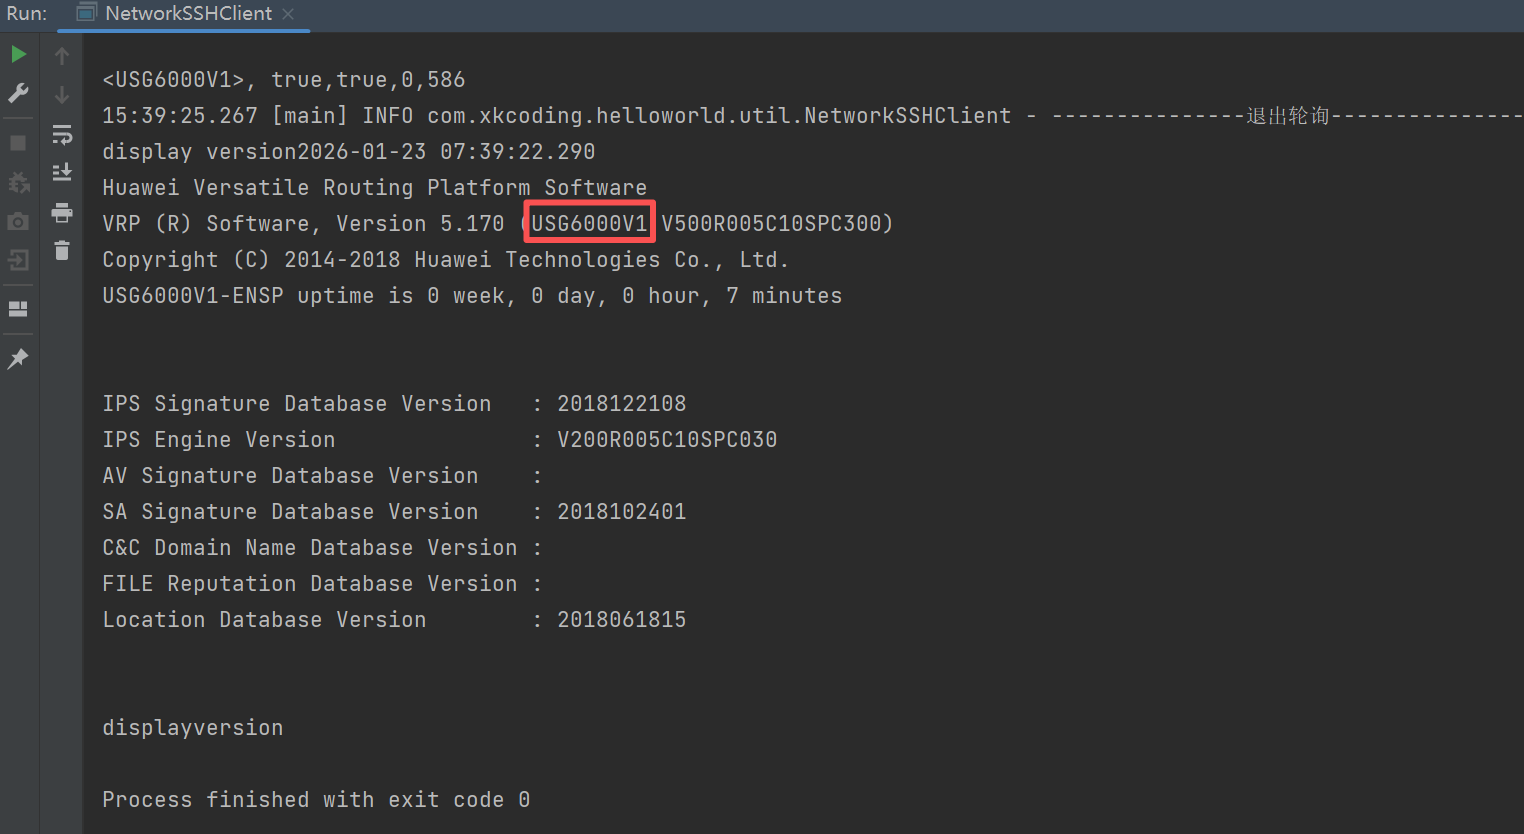
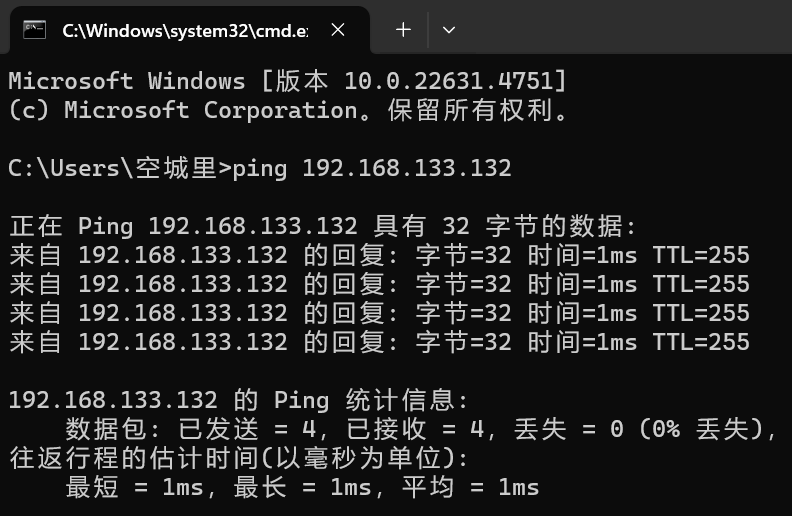
在物理主机ping防火墙USG6000V,192.168.133.132,正常即可进行ssh连接测试
测试结果如下,正常调用
display version命令